Your cart is currently empty!
Category: [06-Systems]
Overall planning and design, as well as various general articles and resources
-

Implementing Your Dreams on the Permaculture Homestead

When developing a permaculture homestead, you’ve got a lot of dreams and it’s easy to feel overwhelmed. Are you wondering where to start? Here’s how to look at all you want to accomplish and create a plan that breaks it down into manageable tasks. This is called implementation planning.
Posts may contain affiliate links, which allow me to earn a commission at no extra cost to you. This helps keep costs down so that I can continue providing high quality content to you for free. I appreciate your purchase through the links! (full disclosure)
In my article 6 Maps to Draw for the Permaculture Designed Homestead, I walked you through creating a Master Plan for your productive homestead paradise. In this article, we will work from the Master Plan to produce Phases of Implementation. (You can’t do it all at once!)
Here is my Master Plan:
Implementation Planning
With our Master Plan in hand, we have a grand vision for our homestead. In my own Master Plan above, MY DREAM is to create:
- a food forest
- a meadow
- walking trails in the woods with edible foraging strips throughout
- a vegetable garden
- a collection of outbuildings including a garden shed, wood shed, small livestock compound, composting center, and greenhouse
Now, each of these dreams will take significant time, effort, and cost to complete. The worst thing I could do is try my hand at all of them at the same time, willy-nilly! I want to give each one the proper attention so it is done well and functions efficiently within the whole system.
What we need now is a realistic schedule that not only breaks down the whole list into manageable steps, but that also considers emergent and limiting factors to put the steps into the most efficient and logical ORDER.
Let’s dive in and see if we can make sense of this.
#1: The BIG LIST Exercise
In this step, list out all of the MAJOR considerations within each of your dreams. Here’s an example of the difference between a major and minor consideration:
Major Consideration: Having a water source for your garden
Minor Consideration: What you want to plant (that part comes later!)Example:
For my Vegetable Garden Dream, I must consider the following major tasks/challenges:
- Water: Downspouts from the house need buried and directed to garden, there is no spigot near the garden
- Storage: There is no storage for supplies or materials near the garden
- Garden Design: Plan layout of permanent beds within footprint of garden boundaries
- Bed Development: Import some organic matter, and may need materials to build raised beds
- Fencing: Deer, raccoons, and many more critters from the woods will likely be vying for my delicious crops
I’ve put the above tasks and challenges into the most logical order I can think of in this moment. I definitely don’t want to plant a garden before I have a water source or before I have a place to store equipment and materials.
I also don’t want to plant anything before I’ve put up proper fencing. I know the deer will be a problem, so rather than plant a garden and then curse the deer for eating it, I will accept the reality of the situation and take the proper action before growing any crops. (Always avoid time and money wasters whenever possible).
Back to my Dream List: the food forest, meadow, walking trails, and outbuildings are next on the docket for this exercise. For each, I will list all of the major considerations and challenges that I can think of, and the order in which to do them that seems to make the most sense with the information I have available to me today.
Now, I could willy-nilly start growing vegetables in random places around my property, but if I want to have a cohesive and efficient design, I’m going to have to put all of my focus on proper development. At this stage, willy-nilly vegetable growing would distract me from completing my development goals. High-intensity vegetable gardening can happen later when I’m not putting all of my eggs into the development basket.

A Word About Realistic Expectations:
It’s important to have realistic expectations of the amount of time you have to devote to your homestead development efforts. Development phases don’t ALSO have to be super-productive phases. The original Tenth Acre Farm was developed over 8 years with very little productivity in those first couple of years, but the end result was an amazingly beautiful, efficient, and productive micro-farm.
Both productivity and development CAN be done at once, but only if you’re a full-time homesteader (having more time to do it all), or if you’re NOT concerned with designing and developing an efficient homestead (in which case, this article is not for you).
Would you like to learn more about using permaculture design to improve the biodiversity of your garden, reduce maintenance, and increase yield?
You’ll find loads of information just like this in my book, The Suburban Micro-Farm.
#2: The EMERGENT AND LIMITING FACTORS Exercise
In this step, you will go deeper into what factors may affect the ORDER in which you complete your steps.
Emergent Factors are emergency-type tasks that need to be completed right away for some reason or another.
Example 1: Our basement floods when it rains because the downspouts are improperly channeled and the formal landscaping is improperly graded.
I’ve moved ‘properly channel downspouts toward future growing areas‘ to the top of our task list because it solves an emergent issue. I’ve also added ‘regrade and redesign formal landscape‘ to the top of the task list for the same reason.
Example 2: Previous owners allowed giant trees to grow right next to the house, in direct line of the wind. *Holding breath when bad storms come through.
I’ve moved ‘work with arborist to remove trees that could be a safety threat during a storm‘ higher on the list. Benefit: Space for a food forest is created where previously there was none! Smaller fruit trees and shrubs will not threaten safety or damage to the house.
Example 3: You have livestock, pets, or children and need fencing ASAP.
In example three above, think about what would need to be completed before fencing can be installed. Does an access road/path need put in first? How about animal shelter—will it be easy to bring in materials for building animal shelters after the fence is up? Have you planned for properly sized gates? Are there any pipes or electrical wires that need buried first?
One emergent factor can create a cascade of other tasks that move higher on the list.
Limiting Factors are challenges that might prevent certain tasks from being completed in a certain order.
Some examples are:
- Seasonal: Tasks that can only be completed in a certain time of year or season
- Financial: Tasks that have to wait until money is saved
- Labor: Tasks that must be completed by skilled professionals or that have to wait until helpers are available
- Resource: Tasks that must wait until resources/tools/materials are purchased/collected/delivered
Example: My Vegetable Garden Dream requires that we build a garden shed for tool/material storage, which must also include a spigot for watering (running a water line as well as electric). This will be time-consuming (and perhaps expensive) to build. When I factor in the additional costs of garden bed development and fencing, the vegetable garden project as a whole moves lower down on the list while we save money for it.

#3: The SMALL CHANGES WITH AN IMMEDIATE BENEFIT Exercise
Are there any steps that are easy to complete, would create significant momentum, and can be done before other tasks? In permaculture, this is called ‘the least change for the greatest effect’. We want small and easy wins to motivate and encourage us to keep going (low hanging fruit).
It can be beneficial to work outward from your zone 1 (see 6 Maps for your Permaculture Homestead for an explanation of zones) or other already managed areas.
Example: Regrading and redesigning my formal landscape (zone 1):
- allows us to bury downspouts and properly direct them toward growing areas (passive irrigation)
- eliminates basement flooding
- improves biodiversity with more flowering and native plants (good for future gardens)
- improves curb appeal and general enjoyment of outdoor sitting areas
- reduces formal landscape by 685 square feet, making it more manageable so there is more time for food-growing projects
Now obviously the formal landscape is not useful in the sense that it produces a lot of food. But it does help us knock out several challenges at once, giving us momentum, and takes away the nagging in the back of my mind about the jungle that was growing by the front door.
This exercise ultimately helps to relieve our mind of the worry of all there is to do and starts momentum in the right direction. When we have a clear plan of action, we can simply focus on the next thing on the list, and put all our energy into it.
#4: The TIMELINE Exercise
For this exercise, it can be helpful to physically put your major tasks in the most efficient/logical order. I like to use sticky notes on a whiteboard, other people like to use index cards, and still others like to use a spreadsheet on the computer. Choose what works for you.
Here’s what my timeline looks like when I put all of the major tasks into order, when I consider my dreams, emergent/limiting factors, and easy wins:
#5: The PHASES OF IMPLEMENTATION Exercise
You probably feel pretty good about getting all of your dreams—and the tasks that help you achieve them—into a physical list to work from. This is amazing, and no small feat of accomplishment. Pat yourself on the back!
But we can go a step farther and divide this list of tasks into PHASES. Phases can be thought of in terms of YEARS. Alternatively, each phase could have an indefinite ending, where due to time or budget constraints you commit to working on each phase until it is completed, with no guilt or sense of urgency.
When I take the 25 tasks on my timeline above and divide them into phases, here is what I get:
Here’s why you want to create phases of implementation: Checking things off a list feels really good! But more important than that, it’s important to have a stopping point. We could to-do-list ourselves right to our grave, and life is definitely more than a to-do list.
Stop to enjoy and appreciate what you’ve created, while you have the wherewithal to do so. Celebrate your hard work and commitment to work done well. Here at Tenth Acre Farm, we always have a little celebration when something gets checked off the list.
The cool thing about doing this with sticky notes on a whiteboard is that if something doesn’t get done during the prescribed phase, it can be easily moved to the next phase with just an adjustment of sticky notes.
What I didn’t include in my phases of implementation on the whiteboard presentation above (for lack of space) is Year Zero:
This was our first year at our new home, and the year we took to observe the natural happenings of our land, discover what animals and insects call this home, see how things change throughout the seasons, and vision for the future. Some ideas for our homestead were fleeting, while others remained firm in our minds as the year went on. These were the ones worth adding to our master plan and spending time and money on.
During Year Zero, we saved money for Phase One, developed the plan I’ve shared with you here, and prepared to jump into Year One with both feet. In the landscaping profession, the prep time before a job starts is called “staging”. This is where you collect all of the necessary materials, equipment, and plants for a particular job.
I liken “year zero” to “staging”. We are designing, planning, budgeting, and collecting the materials necessary to jump in to “year one” with both feet, which will help to avoid the problems and time-wasters associated with jumping in without a plan.
Our Phase One here at Tenth Acre Farm at Twisted Creek:
As you can see in my Phases of Implementation photo above, we’ve already checked a few items off our Year One list and have gained momentum.
We brought in a professional tree service to take down the tall trees that were too close to the house. They chipped up the small stuff, which is a great beginning for the food forest. They left the big stuff, and we’ll slowly turn it into firewood and lumber. Once the heavy machinery was gone, we buried the downspouts, directing them to the garden areas, and regraded the formal landscaping.
I’ve redesigned the landscape, and I’m excited to have 685 square feet LESS of landscaping areas to manage. The remaining landscaped areas will be more beautiful, more biodiverse, and easier to maintain. I can’t stop smiling as we head toward food forest development right on time!
Summary
Developing a homestead is an exciting and rewarding venture, but it can be overwhelming to figure out how to accomplish all there is to do. Implementation planning can be super helpful for breaking down all you want to accomplish into manageable tasks and putting them into a logical and efficient order.
References
- Practical Permaculture: for Home Landscapes, Your Community, and the Whole Earth by Jessi Bloom and Dave Boehnlein
- Permaculture Design: A Step-by-Step Guide by Aranya
Need more homestead inspiration?
The following articles will help you on your journey toward a fulfilling and productive homestead life.
Homesteading:
- 5 Reasons to Homestead in the Suburbs
- 7 Ways to Start a Homestead (Without Being Overwhelmed)
- 80 Ways to Homestead Without a Garden
- How I Started Homesteading
- Is Homesteading Attainable?
- The Romanticism of Homesteading: The Life of a True Homesteader
- What If You Can’t Grow All of Your Food?
Growing Food:
- 5 Myths About Micro-Farming: What’s Keeping You From Your Goals?
- How to Start a Garden on a Budget
- The Challenges of Rebuilding Culture in the Suburbs Through Community Gardens
- Want to be a Micro-Farmer? 6 Tips for Success (and 6 Things Not to Do)
Need more ideas for growing a permaculture garden?
The following articles will help you on your journey toward a vibrant and productive garden.
Learn more about permaculture in my article What is Permaculture?
Permaculture Homestead Design Tools:
Permaculture Deep Thoughts:
- Do You Make These 3 Permaculture Mistakes?
- How to Choose the Right Permaculture Class
- Why We Don’t Keep Chickens (Yet)
Permaculture Gardening Techniques:
- 10 Reasons to Plant a Hedgerow
- How to Plant a Hedgerow
- Benefits of the Edible Forest Garden
- Here’s a Quick Way to Terrace a Hill
- How to Kill Poison Ivy in 5 Steps
- The Circle Garden for Low-Maintenance Gardening
Growing Perennials Permaculture-Style:
- 4 Berry-Producing Shrubs that Fertilize, Too!
- 5 Steps to Planting Fruit Trees
- 20 Perennial Crops for Wet Soil
- How to Grow and Use Currants
- How to Build a Fruit Tree Guild
- How to Grow a Jelly Garden
- How to Grow Perennial Sunflowers for Mulch
- The Cherry Tree Guild & Natural Pest Control
Improving Soil:
Water Management:
- Contour Gardening to Minimize Irrigation & Maximize Yields
- Front Yard Rainwater Catchment
- What is a Swale & Why You Need One
- How to Construct a Swale in the Residential Landscape
The Power of Permaculture Herbs:
- 5 Reasons to Grow Chives
- 5 Reasons to Grow Yarrow
- 5 Weeds You Want in your Garden
- 6 Flowers to Grow in the Vegetable Garden
- 6 Reasons to Grow Oregano
- 7 Reasons to Grow Calendula
- 7 Ways to Fertilize the Garden with Comfrey
- Does Comfrey Really Improve Soil?
- Does Your Permaculture Garden Need Daffodils?
- Grow Chives for the Best Strawberries
- What is Comfrey and How to Grow It
- When Weeds are Good
Would you like to learn more about improving the biodiversity of your garden, reducing maintenance, and increasing yield?
You’ll find loads of information just like this in my book, The Suburban Micro-Farm.
How have you used implementation planning to pace your way through completing a dream?

https://www.tenthacrefarm.com/2017/06/implementing-your-dreams-on-the-permaculture-homestead/
On – 04 Jun, 2017 By Amy
-

Balancing The Homesteading Life Part 2 – HomesteadEdu Campus
Balancing The Homesteading Life Part 2

Hey all,
I’m sharing part 2 of my multiple part series on simplifying your life and making your homestead not turn stressful for you. You need to keep a balance. So, with that said, here are some more things that we’ve found have helped us on our homestead.As I mentioned in the last post, it’s easy to get so wrapped up in your garden or livestock that it becomes overwhelming. We do need to take a break for our loved ones. Stuff is just stuff. Sometimes the garden will need to wait. Be present for your family. Take time for friends. When they remember you, you want them to remember you not for the way your homestead was always immaculate, but for being a warming, loving and caring person who took time out to really love them.

Also, while you are working on your homestead, look for deals. Lack of money can be a big burden. You don’t always have to go pricey on everything. Sometimes, you can find a great deal on just one component of something you would like to have, and you can get the pieces over time to make something, or you might be able to barter with someone to get an animal that you would want. For example, we’ve bartered meat before in exchange for a doe on the hoof that we really wanted. Craigslist can really be your friend. Keep your impulses in check and don’t buy something before you are sure that it is exactly what you need.
Also, be a learner. Being a learner means that when you have something horrible happen on the homestead, because bad things can and do happen to good people, you take it as a learning opportunity. A learner maintains a positive attitude, and asks questions about how to solve their problems. Learners try to make sure they are linked in with community because everyone can still learn something, and sometimes someone else in your community will have the answer to your difficulty. A learner is a person with perseverance.
Until next time,
Emilyhttp://www.homesteadingedu.com/balancing-homesteading-life-part-2/
On – 19 Oct, 2017 By Emily
-

Backyard Fish Farming – Homesteading and Livestock – MOTHER EARTH NEWS
Van Gorder advises beginning fish farmers to start small — no more than 100 fish the first few seasons. Once you master a few basics, “you will be able to raise several species of fish in tanks, indoors or out, throughout the year,” he says.
In the Waianae cooperative, for example, a few aboveground tanks can produce more than 300 pounds of golden tilapia every six months.
Types of Aquaculture Systems
Here are the four aquaculture systems Van Gorder describes:
Cage Culture. This aquaculture method “provides the simplest means of growing fish if you have access to a pond,” Van Gorder says. He estimates a cage system could be built for about $100. “The only cost is for cage materials, fish and feed.”
In this system, a cage or pen made of plastic pipe and rigid netting is moored in any suitable body of water — a pond, lake, stream or millrace — and stocked with fingerlings that are fed until they reach a harvestable size.
“If you have a farm pond, building a floating cage will provide enough fish to feed your family year-round,” Van Gorder says. Channel catfish is the most common fish grown in cages; tilapia, trout, salmon and hybrid striped bass are other options.
Flow-through. This method diverts a continuous source of cold water, such as a stream, spring or river, into “raceways” that hold fish. Even a small volume of water can create a more productive system than a closed setup. “With just a few gallons of spring water, you can grow trout year-round,” Van Gorder says.
Like cage culture, flow-through systems are simple and relatively inexpensive, unless you don’t have access to a natural source of flowing water. It’s also important to note that flow-through systems are subject to regulations regarding the diversion and use of natural water sources. Be sure to talk with local fish and soil conservation authorities before making use of nearby streams.
Greenhouse Aquaponics. Within some form of greenhouse, this method uses a variety of plants — instead of filters to improve the water quality for fish. In addition to tilapia, trout, catfish or hybrid striped bass, you can grow different vegetables — including tomatoes, lettuce and cucumbers — as you would in conventional hydroponics. However, because fish are living in the water, the nutrient sources for greenhouse aquaponics must be totally organic; no herbicides, insecticides or fungicides can be used.
Greenhouse aquaponics is the most complicated aquaculture method, requiring a high level of management and components such as a water pump and aerator. Backyard fish farmers often combine aquaponics with a home recirculating setup (discussed later in this article). Altogether, such a system could cost up to $1,000, but using recycled materials can bring that price down significantly.
Home Recirculating. This is the answer for would-be fish farmers whose only water source is a garden hose. The best way to create this miniature fish farm is to use an aboveground vinyl-lined swimming pool in a back yard, garage or basement. The cost of such pools varies based on size, ranging from $300 to more than $2,000. They are durable, with only the vinyl liner needing replacement every few years.
For the ideal home recirculating system, Van Gorder recommends a pool 12 feet in diameter and 3 feet high. This size will hold about 2,000 gallons of water when filled to within 8 inches of the top. Unfiltered, that amount of water can produce only 10 to 15 pounds of fish, even with added aeration. But by controlling temperature, removing ammonia and waste, and oxygenating the water, that same amount of water can produce more than 100 pounds of fish in one growing season. Species best-suited to this system include tilapia, catfish, bass, carp and trout.
Because the fish spend all their lives in the same water, maintaining its quality is essential. Water must be clean, kept at the correct temperature and contain enough oxygen. Smaller pools have less margin for error and require even more management. Components of the home recirculating system include:
Solar dome. This is an inexpensive plastic cover that looks like a giant shower cap. Most of the fish recommended for backyard fish farming are warm-water species, which grow best at water temperatures above 80 degrees. In temperate climates, aboveground pools will reach about 70 degrees for only the warmest 12 weeks. But a solar dome will increase the average water temperature to about 80 degrees for at least 20 weeks.
Drum clarifier. This provides a simple way to collect and remove almost all of the organic material that accumulates in the water. Using siphons and a water or air pump, water flows between the pool and two 55-gallon drums that are filled with plastic mesh (orchard netting), which traps the solids.
Biofilter. This simple water wheel removes toxic ammonia from the water. It can be made with PVC pipe, corrugated fiberglass roofing and a few other materials available from your local home improvement store.
Aerator. An air pump or aerator adds oxygen to the water, which is necessary to raise healthy fish.
Emergency power. To keep aeration and pump devices running during blackouts, it’s a good idea to connect the system to a generator; or connect a simple 12-volt agitator to a car battery. Water quality won’t suffer if filtration and clarification are cut off for a few hours, but oxygen levels will rapidly fall if there are many fish in the pool.
Stocking Your Water Garden
Once you decide which system makes the most sense for your circumstances, the next big decision is which fish to raise.
“With an eye toward ‘sustainable aquaculture,’ whenever possible the small-scale fish farmer should utilize those species whose nutritional requirements are more easily met because they feed low on the food chain,” Van Gorder says. Feed pellets for catfish, for example, rely on soybean meal. More than 1 pound of fish can be raised from 1 pound of dry pellets. Carnivorous fish — trout, salmon and striped bass — occupy a higher place on the food chain. It takes 3 to 5 pounds of wild-caught fish to make enough fish meal for pellets that will produce 1 pound of cultured, carnivorous fish.
Here are descriptions of your best options among warm-water species — tilapia, catfish, carp and bass and — cool-water species trout, salmon and perch.
Tilapia. Tastes great and is one of the easiest fish to raise. Tilapia tolerate a wide variety of water conditions, including low oxygen levels and high concentrations of ammonia, and are resistant to diseases and parasites. Tilapia grow quickly under proper conditions — water temperatures of 64 to 90 degrees, with 84 degrees being optimal. Water temperatures less than 50 degrees are fatal. Java, blue and nile tilapia are the best species for backyard fish farming.
Catfish. Exceptional taste and hardy resistance to disease and parasites make catfish another good choice for beginning fish farmers. Catfish grow quickly — a large fingerling can reach 1 pound within five months. Channel catfish is your best bet; brown, black or yellow bullhead catfish are other options.
Carp. Traditionally unpopular for eating, carp from backyard aquaculture might surprise you. When cultured in clean water and prepared properly, it can taste excellent, Van Gorder says. Carp are hardy, resistant to disease and adjust to varying water conditions. Carp tolerate water temperatures from 70 to 90 degrees, but grow best between 80 and 85 degrees. Common, grass, bighead or silver carp can coexist in one aquaculture system.
Bass. The best species is hybrid striped bass, which has an excellent mild taste, even more so than wild bass. Bass is well-suited to cages and recirculating systems, but is more difficult to culture than tilapia, carp or catfish. Fingerlings require attentive care — they do not react well to poor nutrition, rough handling or bright lighting. Large and small individuals must be kept separately. Optimal water temperature is 80 degrees, but bass will tolerate 65 to 85 degrees.
Trout and Salmon. Two of the more flavorful fish, trout and salmon require much more precise conditions than warm-water species; control of water temperature is the primary factor. They require water temperatures between 55 and 60 degrees; rainbow trout can tolerate up to 70 degrees with careful management of oxygen levels. These fish can be stocked together and grow quickly, providing harvestable fish in one season. Best species are rainbow or brook trout and coho or Atlantic salmon.
Perch. The yellow perch is popular for its taste, especially in Canada and the northern United States. It grows best in water temperatures between 68 and 74 degrees. Yellow perch eat trout feed and can grow to a harvestable size — a third of a pound — in one season.
Fish Farming Resources
Getting Food From Water: A Guide to Backyard Aquaculture
By Gene Logsdonhttps://www.motherearthnews.com/homesteading-and-livestock/backyard-fish-farming-zmaz06amzwar
On – By George DeVault
-

How To Start Modern Homesteading And Why You Should
Nothing could be further from the truth. Sure, if you want to raise your own cattle, spend a lot of time fixing fences, and not see another soul all day, you’re going to need some land.
If your dream is to go totally off grid and grow ALL your own food, you’re going to need a little land, perhaps an acre, but with a good system, probably a lot less.
But homesteading and self-sufficiency is a matter of scale. And although we all like that warm, fuzzy feeling when we achieve certain goals, the homesteading lifestyle is inherently tied to looking after not only ourselves, but the planet too.
Anything, however small, that we can do to reduce our consumption and waste generation, we should do it. If you have 100 acres, then going totally off grid, raising animals in a kind and sustainable way, growing some crops, riding horses, creating a woodland, are all awesome goals that make a massive difference.
But what about of you are apartment homesteading, with 4 rooms and a balcony as a garden? Does that mean you can’t make a difference? Absolutely you can!!!
Vertical gardening on a balcony, fermenting gluts of own grown or local vegetables into sauerkraut or kimchi, participating in a community vegetable garden scheme (many big towns and cities have them), using a Bokashi indoor compost bin to compost your scraps. Making your own cleaning products from natural ingredients like apple cider vinegar and baking soda. Riding a bike to work rather than taking the car, or organising a car share to save on fuel and pollution.
The opportunities for growth and participation are endless. This definitely does not mean that you should become obsessed and lead a miserable life trying to save the planet. But mindfulness and learning are incredible skills to acquire. You tend to look at life very differently when you have a passion to make a difference in some way.
So, please don’t let size matter (snigger). Some of the most awesome homesteaders are doing it in an urban or suburban environment, not out in the hills or out of earshot of another living soul. Also, some of the most vibrant and active homesteading communities are in the middle of cities, in exactly the places you would never expect to find a thriving band of merry men and women living such a life.
Here’s another misconception that many would be homesteaders face..
I think you may well have surmised from the previous section that this misnomer is defunct. Whether you are 100% self reliant (I really don’t think anyone is these days) or growing only 20% of your own food, you are doing what you can. The city homesteading family who are able to grow some salad leaves and tomatoes, and buy in some cabbage to ferment into nutritious sauerkraut are doing a huge thing…for them!
It might not be huge some someone else, but who should judge that? What makes MY huge endeavor less worthy than YOURS?
I certainly believe that everyone, whether landowner or apartment dweller, should be focused on creating some of their own food, and buying at a local level for the remaining grocery needs. Food miles matter, eating seasonally matters, investing your dollar or local currency in your local producers matters.
Us humans have spent much of our existence scattered, it was threats that brought us together into town and cities, as we sought protection from marauders and other miscreants that would harm us. We sought community, with people who were like us, it was a way of being able to identify ‘outsiders’ who may pose a threat.
Well, things have changed and most of us live in a multicultural society these days, where you give little thought to someone with a different skin tone or dialect. This is of course, a good thing. Community is a good thing too. Humans thrive by living together in communities. Forming connections and alliances can go a long way to improving your life and health, both mentally and physically.
5 Actions You Can Take TODAY To Join The Modern Homesteading Movement
On – 06 Oct, 2017 By Homesteading Steve
-

The Backyard Homestead: Produce all the food you need on just a quarter acre!
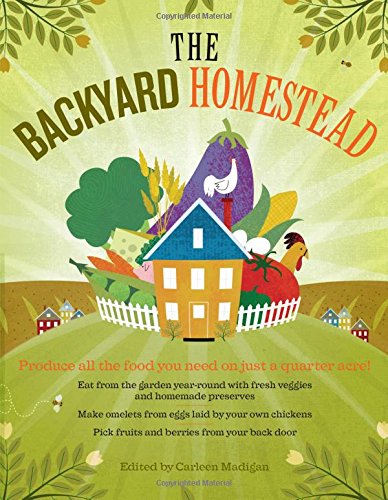
Storey Publishing, LLCPrice:
$18.95$13.45 Free ShippingThis comprehensive guide to homesteading provides all the information you need to grow and preserve a sustainable harvest of grains and vegetables; raise animals for meat, eggs, and dairy; and keep honey bees for your sweeter days. With easy-to-follow instructions on canning, drying, and pickling, you’ll enjoy your backyard bounty all winter long.Storey Publishing

$18.95$13.45 -

Making Your Homestead Pay Part 1 – HomesteadEdu Campus

Making Your Homestead Pay Part 1
Homesteading can be more than just a way to feed yourself. You can both save and make money by homesteading. We’ve helped ourselves out by raising as much as we need and more. Some we barter, some we keep, and some we sell. So, what do we raise or grow extras off, and where do we sell them?
Well, for starters, we raise extra chicks, turkey poults and ducklings. We hatch twice a year and we bought the absolute best stock we could get. These, we sell on Craigslist, by word of mouth, myneighbor.com, and every once and again, the auction barn. We rarely sell through auction though because we get a lower price at the auction than we do through private sale. We see our livestock as cash on the hoof.

We also got licensed to sell seeds, so we raise extra plants to be able to sell. In our state, it’s only $35 to get that license. Aside from selling sprouts, cuttings, and seeds, we also raise rabbits, goats, and occasionally with the goats’ milk, we bring up a calf to sell.
Because we raise dairy goats and chickens, we have milk and eggs frequently available from the farm gate. We also sometimes have yogurt and cheese, and maybe soap for sale. We also have it known in our community that we sometimes have fresh vegetables available at the farm. They just have to ask. Another thing that Jerreth said to tell you all to look into, is a stand at a local farmers market. If you don’t have enough extra to need a stand, you might see if a friend who has a stand might be willing to let you sell yours from their stand. Another thing that we do that is an excellent way to raise a little extra cash, is raise red worms. Fishermen love them. Gardeners that know enough to know, love them too.
I’ll post again next time with a few more things you can do to either save money or raise money with your homestead.
Until next time,
Emilyhttp://www.homesteadingedu.com/making-homestead-pay-part-1/
On – 22 Oct, 2017 By Emily
-

Learn About Natural Weather Forecasting | Prepared For Survival – Food Storage & Preparedness
As most everyone already knows, we did not always have scientific means to predict or forecast the coming weather. People long ago and even today use the other things to predict the weather; animal behavior, patterns they observe and good old fashion folklore and wives tales.If for some unknown reason you were in a place that had nothing new and modern and you had to rely on something else then it never hurts to at least be aware of what is out there, so familiarize yourself with some of the old-time methods used. Of course these methods are neither perfect nor fool-proof, but they really do have their usefulness.GENERAL WEATHER AND FORMULAS
Deaths occur most often when the tide is going out.Births occur when the tide is coming in.You could measure the distance of a storm by counting from the flash of the lightning to the sound of thunder.Winter thunder means snow within 10 days.Make a campfire. The smoke should rise steadily. Smoke that swirls and descends is caused by low pressure (i.e. rain on the way).Take a deep breath. Close your eyes and smell the air.Plants release their waste in a low pressure atmosphere, generating a smell like compost and indicating an upcoming rain.Swamps will release gasses just before a storm because of the lower pressure, which leads to unpleasant smells.A proverb says “Flowers smell best just before a rain.” Scents are stronger in moist air, associated with rainy weather.Grow some scarlet pimpernel – Known as the Poor Man’s Barometer, its flowers close when atmospheric pressure decreases and rain is on the way. Dandelions and tulips do the same.You can predict the weather with a persimmon seed. Here’s how to do it:
Cut open a persimmon seed.Look at the shape of the kernel inside.If the kernel is spoon-shaped, lots of heavy, wet snow will fall. Spoon = shovel!If it is fork-shaped, you can expect powdery, light snow and a mild winter.If the kernel is knife-shaped, expect to be “cut” by icy, cutting winds.It’s best to use ripe seeds.Did you know that you can tell the temperature by counting the chirps of a cricket? It’s true!Here’s the formula:
To convert cricket chirps to degrees Fahrenheit, count numbers of chirps in 14 seconds then add 40 to get temperature.Example: 30 chirps + 40 = 70° FTo convert cricket chirps to degrees Celsius, count number of chirps in 25 seconds, divide by 3, and then add 4 to get temperature.Example: 48 chirps /(divided by) 3 + 4 = 20° CReading a Pig’s spleen can predict the weather
Divide the spleen from top to bottom into 6 parts.The top closest to the head shows current month.Bottom is the last of the six months.Where the spleen thickens, a change in the weather is indicated, usually pointing to a cold spell.Where there’s a pronounced bulge, expect even more inclement weather.Reading a Goose Bone
Watch the coloration as the bone dries.If the bone turned blue, black, or purple, a cold winter lay ahead.White indicated a mild winter.Purple tips were a sure sign of a cold spring.A blue color branching out toward the edge of the bone meant open weather until New Year’s Day.If the bone was a dark color, or blue all over, the prediction was for a real bad winter.The woolly bear caterpillar-with its 13 distinct segments of black and reddish-brown-has the reputation of being able to forecast the coming winter weather. According to legend, the wider that middle brown section is (i.e., the more brown segments there are), the milder the coming winter will be. Conversely, a narrow brown band is said to predict a harsh winter.ANIMALS
If a deer or cow has extra layers of fat when slaughtered there will be a bad winter coming.Cows that suddenly gather beneath large trees means rain is coming.Expect rain when dogs eat grass.Expect rain when cats purr and wash.Expect rain when sheep turn into the wind.Expect rain when oxen sniff the air.Expect rain when swine are restless.
If the deer are out early grazing there is big storm coming.Squirrels’ nesting in dead trees instead of making nests of leaves mean a harsh winter.If the cows in pastures are all lying down, it’s a sure sign of rain.If the bull leads the cows to pasture, expect rain.if the cows precede the bull, the weather will be uncertain.When cats sneeze, it is a sign of rain.Bats flying late in the evening indicate fair weather.If the groundhog sees its shadow on Candlemas Day (February 2), six more weeks of winter remain.When horses and cattle stretch out their necks and sniff the air, it will rain.If the mole digs its hole 2½ feet deep, expect severe weather.If the mole digs its hole two feet deep, not so severe weather.If the mole digs its hole one foot deep, expect a mild winter.When pigs gather leaves and straw in all, expect a cold winter.When rabbits are fat in October and November, expect a long, cold winter.If sheep ascend hills and scatter, expect clear weather.Wolves always howl more before a storm.BIRDS
Birds singing in the rain indicates fair weather approaching.If birds in the autumn grow tame, the winter will be too cold for game.Partridges drumming in the fall mean a mild and open winter.Chickens cackle and owls howl just before rain.If crows fly in pairs, expect fine weather; a crow flying alone is a sign of foul weather.When fowls roost in daytime, expect rain.Seagulls tend to stop flying and take refuge at the coast if a storm is coming.Animals, especially birds, get very quiet immediately before it rains.The whiteness of a goose’s breastbone indicates the kind of winter: A red of dark-spotted bone means a cold and stormy winter; few or light-colored spots mean a mild winter.When domestic geese walk east and fly west, expect cold weather.Hawks flying high means a clear sky. When they fly low, prepare for a blow.Petrels’ gathering under the stern of a ship indicates bad weather.When the rooster goes crowing to bed, he will rise with watery head.When seagulls fly inland, expect a storm.When the swallow’s nest is high, the summer is very dry.When the swallow builds low, you can safely reap and sow.A very old wives tale says if birds feed in a storm it will rain for a long time, if they don’t it will clear soon.INSECTS AND REPTILES
If ants their walls do frequent build, rain will from the clouds be spilled.Ants are busy, gnats bite, crickets sing louder than usual, spiders come down from their webs, and flies gather in houses just before rain.When bees to distance wing their flight, days are warm and skies are bright; But when their flight ends near their come, stormy weather is sure to come.Turtles often search for higher ground when a large amount of rain is expected. You will often see them in the road during this period (1 to 2 days before the rain.)Fireflies in great numbers indicate fair weather.When hornets build their nests near the ground, expect a cold and early winter.When cicadas are heard, dry weather will follow, and frost will come in six weeks.When spiders’ webs in air do fly, the spell will soon be very dry.Spiders in motion indicate rain.If you kill a spider indoors, it will bring rain.If you killed a snake hang it over a fence and it will rain.When spider-webs are wet with dew that soon dries, expect a fine day.Spider-webs floating at autumn sunset bring a night frost.The louder the frogs croak, the more the rain.Frogs singing in the evening indicates fair weather the next day.Leeches kept in glass jars are active just before rain.Hang up a snake-skin and it will bring rain.RAIN AND CLOUDS
Unusual clearness in the atmosphere, with distant objects seen distinctly, indicates rain.Red skies at night, Sailor’s delight. Red skies at morning, Sailor take warning.Evening red and morning gray are sure signs of a fine day. Evening gray and morning red put on your hat or you’ll wet your head.If it rains before seven, it will clear before eleven.When the wind blows the leaves on the trees upside down there will be a bad rain.Rain from the south prevents the drought, but rain from the west is always best.Anvil-shaped clouds bring on a gale.A cloud with a round top and flat base carries rainfall on its face.When small clouds join and thicken, expect rain.Black clouds in the north in winter indicate approaching snow.When there is enough blue sky to patch a Dutchman’s breeches, expect clearing weather.A curdle sky will not leave the earth long dry.If you see clouds going crosswind, there is a storm in the air.Hen scarts and filly tails make lofty ships wear low sails.Clouds floating low enough to cast shadows on the ground are usually followed by rain.Mackerel sky, mackerel sky, never long wet, never long dry.If three nights dewless there be, ’twill rain, you’re sure to see.If heavy dew soon dries, expect fine weather; if it lingers on the grass, expect rain in 24 hours.With dew before midnight, the next day sure will be bright.If you wet your feet with dew in the morning, you may keep them dry for the rest of the day.The higher the clouds, the finer the weather.If you spot wispy, thin clouds up where jet airplanes fly, expect a spell of pleasant weather.If small puff clouds (cumulus) in the morning or early afternoon have rounded tops and flat bases, if they grow higher than the cloud’s width, then there’s a chance of a thunderstorm forming.Clear Moon, frost soon.Ring around the moon and it will rain real soon.If the night is clear enough to see the Moon and the temperature drops enough, frost will form. Expect a chilly morning!When clouds appear like towers, the Earth is refreshed by frequent showers.Rainbow in the morning gives you fair warning.A rainbow in the morning indicates that a shower is west of us and we will probably get it.Rain foretold, long last. Short notice, soon will pass.The gray overcast dominating the horizon means a large area is affected.If you get caught in a surprise shower, it’s likely to be short-lived.Red sky at night, sailors delight. Red sky in morning, sailors take warning.When the moon points up, the weather will be good.when the moon points down, it will rain.When a large star, or planet, is near the moon, the weather will be violent.If the new moon is on Monday, then the weather will be good.If a new moon occurs on a Saturday, then there will be twenty days of wind and rain.If a new moon occurs on a Sunday, there will be a flood before the month is over.The strongest storms and hurricanes are likely to be 1-3 days after a new moon and 3-5 days after a full moon.Fog and a small moon bring an easterly winds.A dry moon is far north and soon seen.If the new moon is far north, it will be cold for two weeks.If the new moon is far south, it will be warm.When the moon runs low, expect warm weather.For more great articles on everything Kentucky and Country Living please go to our Kentucky Farmhouse website. Check out our series on myths, legends, omens, old wives tales and Folklore for other areas of your life.http://preparedforsurvival.blogspot.com/2017/10/learn-about-natural-weather-forecasting.html
On – 11 Oct, 2017 By
-

Self-sustaining vs. self-sufficient — The Write Farm – WORLD ORGANIC NEWS
There’s a lot of hype these days about homesteading and the self-sufficient life. Getting away and out from under the “thumb” of the man, providing 100% of our own needs, having no bills, living simply by our own rules seems like a fairy tale. No one to answer to but ourselves. Relying on our own […]
On – 09 Oct, 2017 By mrjonmoore
-

Taking a Pass on Gas – Wood Preferred | Two Ice Floes

Taking a Pass on Gas – Wood Preferred
By
High Desert Homesteading
We recently bought a 22 year old house that had a massive rock gas fireplace. Not only was it useless for producing heat (being mostly decorative) it burned a fossil fuel controlled by a public utility. We much prefer a real fire, not to mention we have years of standing firewood on our property.
While a real wood fireplace/stove was on our prerequisite list for our new home, this house had pretty much everything else. Since the existing fireplace was very large and constructed of solid moss rock, we assumed it must have been a real fireplace at one time and later converted to a gas fired insert by a previous owner.
Forgive the quality of some of the photos. This was an exhausting process for an old guy, so I took photos with whatever device I had handy at the time.


The first part of this article will cover the three D’s: Discovery, Disappointment and Demolition.
While I personally installed a wood boiler and two wood stoves at the old homestead, I had no experience with a major conversion. The first stop was to a local home and hearth type store to get an idea of what we were dealing with and the options for wood inserts…assuming we could use the existing moss rock structure.
We were told it was essential to determine if the structure was originally a wood burner or built for the gas insert – because if it was originally built for gas – you CAN NOT convert it to wood. I thought the “you CAN NOT convert” statement was just a sales line since most home and hearth stores make the majority of their profit on installation work – not the stove they sell you.
However, the first step was knowing for sure if this was an old wood burner or someone actually went to all the labor and expense to build this massive moss rock structure for an older gas insert (older meaning it looked as much like a real wood fire as a politician’s smile).
The house has a large wooden chase on the roof that could have easily accommodated a masonry or insulated pipe chimney. Since the gas insert was nicely mortared into the rock structure, I choose the roof as a starting point to see if looking inside the chase would provide any real clues as to the gas/wood question.
Having fallen off a 2-story roof about a decade ago, I was really hoping to avoid a similar fate this time. However, since there were no active thunderstorms with high gusts of wind (the cause of my previous fall) I cautiously made the climb and pulled the lid from the chase. This provided my first dash of disappointment. There was no indication of a previous masonry chimney and the existing hole for the gas exhaust pipe indicated a larger, insulated double-walled exhaust pipe sometimes used for a wood burning fireplace was never there.
Not one to easily give up hope until (all) the facts prove otherwise, I knew the house had been re-roofed a couple of times during its life. It was possible that all evidence of a wood burner was removed when the gas insert was installed and the house re-shingled. The only way to know for certain was to get a look inside the moss rock structure to see if it contained an old firebox/masonry structure or if it was constructed of wood framing.
As you can see from the photo below, this was not going to be easy because the installation of the suspected gas insert was done well – the insert frame was completely mortared into the structure. I needed to get a look inside while causing a minimum amount of damage in case we decided to forget this project and stick with the gas insert.

Fortunately I have a 15’ long, USB powered borescope. Essentially this is a camera lens placed at the end of a long flexible tube that can be plugged into you phone with an adapter or directly into your computer/laptop/tablet. These can be purchased for less than $20 on eBay. I removed the glass front of the gas insert and drilled a small hole into the top of the firebox in a location that could be easily patched. I then fired up the borescope on my tablet and went in.
Disappointment was only seconds away. While certainly not providing a 4K, HD image, the borescope clearly showed what I most definitely did not want to see: Wood studs and insulation – everywhere. This left no doubt that our massive moss rock structure was, in fact, originally built for the gas fireplace insert – first wood framed, then sheetrocked and finally stone faced and mortared.
No worries – I just have to figure out the process of converting the existing structure to a wood burner. There has to be a way.
My initial disappointment grew as I spent night after night researching every possible avenue trying to find a reliable source that explains how to convert the gas fireplace into a wood burning one. The bottom line is you can’t! Even with a zero-clearance wood burning insert, one which doesn’t require a heavy masonry chimney, the heat generated by the actual wood burning insert itself is too extreme. It is against every building code in the US to do this and is a major fire hazard.
That left only two choices: Rip out the entire moss rock structure and start over, or leave it in place and place a wood stove in front of it. Either way, I (finally) agreed with my wife that with all the other projects that needed to be done, I would, for once, not do this myself. This was to be the first major project I would let a contractor complete. That was until the bids came in. The going rate for removing the moss rock structure, putting the rocks back on the wall and installing the wood burning stove we wanted was over $8500. Way out of our budget. Not going to happen.
After a week of staring at the structure, “Laying Hands” upon it (just trying to get a feel for how many tons of rock/mortar would have to be removed) my wife and I agreed if we wanted a wood stove and wanted it done right, like most everything else we would have to do it ourselves.
Removing the gas insert was not too difficult. Simply remove the mortar around the trim, disconnect the gas line and electrical connections, ‘saws-all’ the sheet metal firebox enough to bend it in, remove some screws and it pulled right out. Just cap off the gas line (I planned to leave it stubbed out on the hearth for possible future use), put some wire nuts on the bare electrical wires (I will re-route it to be used for future use powering a blower unit) and we were ready for the next step.
Now the real fun began. As you can tell from the photos, the moss rocks in question are not pebbles. Some are 2-3 sq. feet and 4”-6” thick. It was time for a serious tool and a lot of manual labor. We decided that I would perform the highly skilled and technical job of operating the small jack/jill hammer and my wife would carry the stones outside as I popped them off. It seemed a fair division of labor in my book.
Popping the stones off was fairly easy. Just place the chisel bit at a 45 degree angle where the stone meets the mortar and pull the trigger. I had to chisel several spots on some stones, but they all popped off without a lot of effort. And, yes, I did actually help my wife carry out the larger ones.
Once all the stones were gone, that left what proved to be a tougher job, removing the 3-4” layer of wired in mortar that covered the structure. I don’t want to indicate that my wife gets upset when a big mess is being made, but I put in ear plugs for this procedure – and it wasn’t to protect me from the sound of the demolition hammer.
After most of the mortar had been removed, it was time to deal with the wood mantle. The mantle consisted of a bunch of laminated pine 2x6s. It measured 5.5” thick, 18” deep and 8’ long – basically solid pine. During construction they framed and dry-walled the area, then hoisted the mantle into place and angle-screwed it top and bottom into every stud. Then the mortar and moss rocks were added, locking the mantle into place.


At this point the only thing left to do was remove all the screws and figure out how my wife could support the 100-150 lb mantle as I removed the last few screws – assuming the weight didn’t just suddenly snap off the screws and allow the mantle to drop uncontrollably.
Fortunately I maintain a miniature hardware store in the shop. I grabbed some pulleys, rope and 4 self-drilling lag bolts (I love those things). Lagging the pulley contraption at the top of the structure and into the sides of the mantle did the trick. As the screws were removed down the line, the pulleys took the weight. Removing the last screw allowed the mantle to gently detach from the wall without breaking any toes, or worse – creating a big mess.
After the mantle was down and dragged out the back door (where it still sits at the time of this writing) it was fairly easy with the help of a saws-all to cut out the framing/drywall in large sections. Done! That left us with bare studs on the back wall and part of the ceiling and a hearth only half covered in flagstone.
Our initial thought was to re-use the moss rock on the back wall. However, since neither my wife nor I are spring chickens, the thought of mixing literally a ton of mortar and lifting all the rocks back up to the top of the wall was less than appetizing. We discussed numerous design ideas (using lighter materials) and came up with something we both liked.
If you are curious about the vertical silver tube mounted between the studs in the photo above, you will have to return for Part Two of this article, which will begin to cover the rebuild process.
Below is an image mock-up I did prior to the rebuild of what we were shooting for.
High Desert Homesteading

http://twoicefloes.com/taking-a-pass-on-gas-wood-preferred/
On – 28 Oct, 2017 By Cognitive Dissonance
-

The Ultimate Self-Sufficiency Handbook: A Complete Guide to Baking, Crafts, Gardening, Preserving Your Harvest, Raising Animals, and More (The Self-Sufficiency Series)
This compact guide provides advice, tips, and step-by-step instructions for hundreds of projects, offering the entire family the tools they need to make the shift toward self-sufficient living. Readers will learn to dip candles, bake bread, make maple syrup, start a vineyard, and much more. With special features for young homesteaders, this is an essential…;

Skyhorse PublishingPrice: Free
This compact guide provides advice, tips, and step-by-step instructions for hundreds of projects, offering the entire family the tools they need to make the shift toward self-sufficient living. Readers will learn to dip candles, bake bread, make maple syrup, start a vineyard, and much more. With special features for young homesteaders, this is an essential family guide to self-sufficient living.– Bake Pies, Cakes, and Bread
– Grow Vegetables yy Raise Chickens
– Keep Bees
– Preserve Your Harvest
– Cure Meats
– Build a Treehouse
– Spin Wool
– Make a Toboggan
– And Much More!
Full Customer Reviews:
-

IT’S HERE Our new book ‘The Minimalist Gardener’ has arrived. Get your copy hot…

?? IT’S HERE ? Our new book ‘The Minimalist Gardener’ has arrived. Get your copy hot off the press#minimalistgardening #minimalist #gardener #growyourownfood #grow #permaculture #nodig #nature #minimal #edible #productive #growing #garden #herbs #urban
-

Lots of different permaculture design for suburban plots
Lots of different permaculture design for suburban plots
Click here to read the full article.
-

How to Design your Livelihood with Permaculture
How to Design your Livelihood with Permaculture
AranyaWednesday, 15th March 2017Permaculture teacher and author, Aranya, shares how to create a permaculture livelihood, through poly-incomes, diversity, and planning.

Many people are unhappy in their jobs and yet most don’t do anything about it. Discovering permaculture can be the catalyst for us to start considering how we might make that transition to the more positive-impact lifestyle we aspire to.
At first it may seem that the only available permaculture livelihoods are as a teacher or food grower, but these are just the visible ‘front end’ of a wide network of inter-dependencies. While teaching and writing are my passion, I currently still manage my own websites, do my own accounts and convene some of my own courses. I gained those skills out of necessity, but would love to be able to call on them from within the permaculture community to free up my time for the things I’m more interested in.
So this article shares some ideas and reflections in the hope it will help bring more of you into the permaculture economy.
My Own Journey
As a busy permaculture teacher I’m privileged to spend time with a lot of great people, from all walks of life and with a diverse range of skills. It wasn’t always this way. My journey has taken me through a number of vocations, but going self-employed 15 years ago was one of the best decisions I’ve made, allowing me to fully follow my passions.
Returning to Britain from a year living on the land free of money in Eire, I took a job three days a week as a self-employed gardener. As well as being just the right amount of income to meet my needs, it was a dream job. The owners were hardly ever at home and I could eat any of the abundant fruit in the times between. One day several years later though, when I was weeding the extensive gravel drive by hand (no sprays for me) I had an epiphany.
I was maintaining a desert! – the complete opposite of the permaculture I was sharing with people on the courses I had begun to teach. I decided to give up that gardening job and develop more of a poly-income. I found a different gardening job two days a week and took on some I.T. work, mainly building websites for friends. I apprenticed on a few Permaculture Design Courses (PDCs) and found the confidence to go solo. Though the financial rewards from teaching were initially low, I always gained valuable experience. The things I learnt in particular at that time were:
Money is just one of many possible yields – I once earned just £70 for teaching a two week residential design course. It took place however, on the beautiful Brownsea Island Nature Reserve in Dorset where I returned twice more to teach as part of a great team. Those courses resulted from an introductory day I taught at my home, earning me £20 at the time, but the two people who attended that day each went away and organised three PDCs for me to teach where they lived.
I can never know what course participants will go on to do, so I always do whatever I can to run a course. I was just one of four students on the PDC I took in 1996. My teacher Stephen Nutt could easily have cancelled, but he didn’t and I’ll always be grateful for that.
In promoting a course or event, even if you later have to cancel, you’ll still raise the profile of permaculture in your area.
Over a decade later my poly-income now comes mostly from permaculture teaching, with some royalties and sales of my book and a little consulting. I also have a small online retail-based business to supplement this. I stopped gardening for others a number of years ago, preferring to spend time in my own garden. I always have I.T. up my sleeve in case I should ever need it again.
Create Your Own Livelihood Plan
You may at first consider your acquired skill-set to be redundant in your new future, but we can apply permaculture to most things. An accountant for instance is good with numbers and those skills are needed in many areas of life. Give it a little thought and you may realise that your skillset could be a great asset in the permaculture community. What better way to get some clarity on this than to apply a design process?
Survey
Here are some key questions I would ask in applying permaculture thinking to this topic:
Stocks and flows
What are your ongoing needs – financial and otherwise? Do some vary seasonally? Might you be able to meet more of those needs directly or through other forms of exchange?
What do you have in reserve to support you through a change of livelihood? Finances or otherwise. There are many other forms of capital to consider.
Start by listing your current financial income and outgoings. Look for easy ways to reduce your need for money before seeking ways to increase it.
Personal resources
What skills do you already have? How might these be useful to other permaculture businesses? Start here when looking for opportunities.
What do you love to do – where is your passion? What are you inspired to learn? These things could become part or all of your future income.
Where are you based? Where do you spend time? Are you a home-lover or do you like to travel? Do you have computer skills? Do you love to write?
Do you have more energy in the summer and less in the winter?
Material resources
Do you own or have use of any land or buildings?
What tools, software etc. do you have use of?
Social environment
Who do you have within your network? What can they offer and what might they need?
What does the permaculture community as a whole currently look like? What are the primary communication routes? This might involve some research. Where are the gaps? Could you fill any of these empty niches?
What limits you?
What’s holding you back from doing what you’d most love to do?
Are you unnecessarily wasting any energy, time or money? Where could you make interventions to plug these leaks? It’s always better to save what you have than to find more.
Analysis
While the permaculture ethics of earth care, people care and fair shares can underpin our new livelihood, the principles can help us in framing our decisions. Here’s how you can apply some of them to this challenge. Can you think of any others?
Multiple elements for each important function – aim to create a poly-income (from more than one source) and ensure a good seasonal spread (work with nature). Choose income streams that would be affected differ-ently by any specific changes in the economy/environment. I personally travel and teach a lot throughout the warmer months and retreat to home to be creative, writing in particular, during the winter.
Multiple functions for each element – can you re-purpose what you do rather than re-create some things from scratch? Multi-functioning your journeys is a fairly easy win.
Appropriate scale – choose a livelihood that gives you the freedom to work as much as you need, but no more than you want. One that will allow you to scale up or down should the need arise.
Everything gardens – who loves to do the jobs you don’t want to?
Design for cooperation – find others to collaborate with and create a support structure around you – to share what you learn. There may be niches out there just waiting to be filled, for instance Joel Salatin invites his interns to look for opportunities to create a new business for themselves at Polyface Farms.
Produce no waste – can you make use of waste from somewhere else and find a further use for yourself? I came across a business in Brussels growing mushrooms on waste coffee grounds which then donated their own waste as compost to a local community garden.
Edge effect – where do the resources you need meet? Where are your clients? How can you increase your edge (get noticed etc.)?
Start small and work out from well-managed areas – don’t be in a hurry to make changes. Be like nature and play the long game, evolving your poly-income as you gain new skills.
Succession – look ahead and consider how your environment might change and how you can adapt to stay ahead of the game.
Decisions and Implementation Planning
Spending enough time in the planning stage is important, but at some point we need to take our first steps with our new venture. Create a clear implementation plan – Gantt charts (a chart in which a series of horizontal lines shows the amount of work done or production completed in certain periods of time in relation to the amount planned for those periods) are an excellent way of keeping track of projects. Continue to monitor how well things are going, keeping a track of finances and seasonal changes in demand. Tweak as necessary. Ensure you have a good support structure around you. I personally meet up every few months with a couple of self-employed friends in different lines of work and we share what’s been going well for us and our goals for the future.
And remember, that even the longest journey begins with a single step. What’s stopping you from answering those questions above right now?
Aranya has been carving out a permaculture livelihood for himself for over 15 years, including teaching on average eight full design courses a year. He is also author of the popular Permanent Publications book, Permaculture Design: A Step by Step Guide
Aranya’s website: www.learnpermaculture.com
Useful links
Using permaculture ethics to create a microbusiness
Mini-series: Design your life with permaculture

https://www.permaculture.co.uk/design-your-livelihood-with-permaculture
On – 15 Mar, 2017 By
-

Een permacultuur ontwerp; klik op afbeelding voor een vergroting
Een permacultuur ontwerp; klik op afbeelding voor een vergroting
Click here to read the full article.
-

If you want to buy land for your dream home, you must do these…
If you want to buy land for your dream home, you must do these five critical things BEFORE you purchase
Click here to read the full article.
-

Our Permaculture Design and Demonstration Site
Our Permaculture Design and Demonstration Site.
Click here to read the full article.
-

Swales are an amazing permaculture implementation – It’s a designing system that work harder…
Swales are an amazing permaculture implementation – It’s a designing system that work harder than you do. Pair it with a hugelkultur bed and you’ve got a winning system.
Click here to read the full article.
-

agroforestry+systems+layout | Planning a silvopastoralsystem
agroforestry+systems+layout | Planning a silvopastoralsystem
Click here to read the full article.
-

Week 1 of our Spring Permaculture Design Certificate has been amazing. A week of…

Week 1 of our Spring Permaculture Design Certificate has been amazing. A week of new friends, learning to chart the lay of the land and permaculture design process & fundamentals, eating lots of delish food and visiting inspiring examples of permaculture in action. Well done team!
.The next week will be even bigger as design projects begin to take form… inspiring stuff. We love helping people get their design skills on. Thanks to everyone involved in the first week of this #MilkwoodPDC – it takes a village to make learning like this happen xx
.Here’s to @fertilecrescentblue @brenna_quinlan @popes_produce @milkwood_nick @bellsarama @govindavalley #daptocommunityfarm and all our awesome students ❤️?? – including @up_on_the_rooftop for some of the photos ☺️
-

Contour Stone Lines slow down runoff, increase water infiltration, and sediment is captured behind…
Contour Stone Lines slow down runoff, increase water infiltration, and sediment is captured behind these semi-permeable barriers, improving production. A perennial grass can supplement the lines where stone is scarce. Suited to low slopes, high runoff and hand labour. This technique is readily adopted by resource-poor farmers and can lead to a harvest even in years with low and erratic rainfall.
Click here to read the full article.


