Your cart is currently empty!
Tag: Biodiversity
-

How to Build a Fruit Tree Guild

A guild is a grouping of plants that supports a central element—such as a fruit tree—for maximum harvest and use of space. Learn more about this permaculture technique for creating a low-maintenance system that also improves biodiversity.
Posts may contain affiliate links, which allow me to earn a commission at no extra cost to you. This helps keep costs down so that I can continue providing high quality content to you for free. I appreciate your purchase through the links! (full disclosure)
Guilds are Interconnected Mini-Ecosystems
The use of guilds came about by observing how certain plants would naturally group themselves together in an unmanaged setting without human intervention, as if to demonstrate that their proximity to one another was mutually beneficial (like how birch trees and Douglas firs are interdependent). The concept of designing human-made guilds is relatively new, and many of the early experiments are still in progress.
Still, guilds provide a roadmap for developing interconnected ecosystems, which may reduce our workload and yield more harvests.
The goal of the guild is to underplant a central element, such as a fruit or nut tree, with plants that are highly useful, multifunctional, and that might naturally be found growing together.
For example, underplantings in a guild might include plants that fertilize, repel pests, attract beneficial insects, create mulch, and suppress grass.
The general idea is to take advantage of the benefits of plants to reduce cost, labor, and the need to import materials.
Now, to be certain, planting a tree guild will take more effort than simply planting the tree by itself, and it may also cost a bit more at the outset for the extra plants. However, in the long run, guilds will likely be more resilient and vigorous, even if solely from a biodiversity standpoint.
How you plant a guild will depend on your space, whether you have several acres or less than half an acre. On larger properties there may be space to build a large guild under an expansive, 70-foot tall nut tree, while on smaller properties the central element will likely be something smaller, such as a dwarf fruit tree or berry bush.
If you would like to build a guild, choose a central element that is appropriately sized for your property. Fruit and nut trees can be linked together in a grouping, underplanting them all with guilds. Toby Hemenway, author of Gaia’s Garden: A Guide to Home-Scale Permaculture, would call this a “superguild.” I can also be called a food forest.
I like to call it an orchard on steroids! Check out the 2-hour film The Permaculture Orchard: Beyond Organic for more inspiration.
This “superguild” could be created in the shape of a long hedgerow, which I discuss in how to plant a hedgerow.
Would you like to learn more about improving the biodiversity of your garden, reducing maintenance, and increasing yield using permaculture techniques?
You’ll find loads of information just like this in my book, The Suburban Micro-Farm.

The Apple Tree Guild Example
The most common example of a guild is that of the apple tree guild. With an apple tree as the central element, you can prevent grass from creeping under the tree, and repel wildlife, by planting a ring of daffodils and garlic chives at the drip line of the tree. Bee balm, dill, and fennel peppered underneath will attract pollinators.
Comfrey, dandelion, yarrow, and white clover will accumulate nutrients and fix nitrogen to fertilize the soil. The comfrey and nasturtiums will provide mulch or green manure. The bee balm, garlic chives, and yarrow will emit strong scents to repel pests. Because apple scab fungus is a common ailment of apple trees, the fennel and garlic chives will provide some anti-fungal properties.
See my articles about daffodils and yarrow to learn more about the “superpowers” of these plants!
Observe and Experiment
Now, for certain, the above is not a recipe, merely an example of how you can take advantage of nature’s gifts to create a mini-ecosystem that reduces your workload. Even if you were to follow a so-called recipe such as this one, your guild will likely need tweaking to accommodate the unique conditions of your site.
To see how a guild might need to be tweaked for your local conditions, read about my cherry tree guilds and how I dealt with a pest problem. Although I started out planting some often-recommended guild plants, in the end, my cherry tree guilds needed a little something extra that was unique to my situation.
Permaculture guilds are not exact recipes to follow. They are combinations of plants that people have tried and have observed growing together in natural ecosystems. For example, one day I was hiking in a local park and noticed wild geranium (Geranium maculatum) growing densely throughout the forest with wild ginger (Asarum canadense), so I planted the two together in a shaded pollinator garden where they have thrived.
However, just because these combinations were successful in one environment, doesn’t mean they’ll work in another, so a little experimentation is always in order.
The Beginner’s Guide to Guild-Making
Plant your tree in your selected spot. (For tips on planting fruit trees, see this article.)
Next, measure a circle around the fruit tree using sticks or flags to mark the mature width. This perimeter is called the drip line. The roots of the tree will eventually extend to this point, and perhaps even farther. Because of this, you will increase success by improving the health of the soil inside this circle.
Spread cardboard under the tree, overlapping the ends so the ground inside the drip line is thoroughly covered. Moistening the cardboard with water is beneficial. Cover the cardboard with 3 to 6 inches of compost soil, keeping the soil away from the trunk. Be sure that none of the edges of the cardboard are exposed.
For more tips on planning a fruit tree guild, see this article.
7 Types of Plants to Plant Under the Fruit Tree
Underplant the tree (inside the drip line) with herbaceous plants that:
- attract beneficial insects
- deter wildlife
- fertilize
- mulch
- produce nectar to attract pollinators
- repel pests
- suppress grass
That seems like a lot of plants to fit under one tree, but actually there are many plants that perform more than one function. I call them “super plants”. (They’re kind of like super heroes!) There are a lot of plants to choose from, but the following are some of my favorites:
a. Choose Daffodils or Garlic — They repel deer and other wildlife, repel fruit tree borers, and stop grass from creeping under the tree.
c. Choose Oregano or Chives — They are both aromatic pest confusers, which means that their strong scents will repel pests. They both can also take a little bit of foot traffic, which will be helpful during harvest time.
d. White Clover — It is an excellent source of nitrogen, an essential nutrient for healthy fruit production, and is also often used in orchards as a walkable ground cover. Here’s my source for white clover seeds.
Remember to try your own experiments. Do you have a favorite plant that attracts pollinators and beneficial insects? Give it a try!
Note: Be sure to only step inside the drip line when it’s absolutely necessary for harvesting or pruning. Otherwise, stay outside the drip line to reduce soil compaction.
Now, go forth and create some mini ecosystems (guilds) on your micro-farm!
Need more ideas for growing a permaculture garden?
The following articles will help you on your journey toward a vibrant and productive garden.
Learn more about permaculture in my article What is Permaculture?
Permaculture Homestead Design Tools:
- 3 Reasons to Hire a Permaculture Designer for Your Landscape
- 6 Maps to Draw for the Permaculture Designed Homestead
- Implementing Your Dreams on the Permaculture Homestead
Permaculture Deep Thoughts:
- Do You Make These 3 Permaculture Mistakes?
- How to Choose the Right Permaculture Class
- Why We Don’t Keep Chickens (Yet)
Permaculture Gardening Techniques:
- 10 Reasons to Plant a Hedgerow
- Benefits of the Edible Forest Garden
- Here’s a Quick Way to Terrace a Hill
- How to Kill Poison Ivy in 5 Steps
- The Circle Garden for Low-Maintenance Gardening
Growing Perennials Permaculture-Style:
- 4 Berry-Producing Shrubs that Fertilize, Too!
- 20 Perennial Crops for Wet Soil
- How to Grow and Use Currants
- How to Grow a Jelly Garden
- How to Grow Perennial Sunflowers for Mulch
Improving Soil:
Water Management:
- Contour Gardening to Minimize Irrigation & Maximize Yields
- Front Yard Rainwater Catchment
- What is a Swale & Why You Need One
- How to Construct a Swale in the Residential Landscape
The Power of Permaculture Herbs:
- 5 Weeds You Want in your Garden
- 6 Flowers to Grow in the Vegetable Garden
- 7 Reasons to Grow Calendula
- 7 Ways to Fertilize the Garden with Comfrey
- Does Comfrey Really Improve Soil?
- Grow Chives for the Best Strawberries
- When Weeds are Good
Have you experimented with fruit tree guilds? What has worked for you?

https://www.tenthacrefarm.com/2017/07/how-to-build-a-fruit-tree-guild/
On – 07 Jul, 2017 By Amy
-

Create a Food Forest for Low-Maintenance, Edible Rewards

A food forest, or edible forest garden, is a food production strategy that mimics a woodland ecosystem. Find out how to create a low-maintenance, perennial, permaculture garden with edible rewards!
Posts may contain affiliate links, which allow me to earn a commission at no extra cost to you. This helps keep costs down so that I can continue providing high quality content to you for free. I appreciate your purchase through the links! (full disclosure)
What is a Food Forest?
A food forest mimics a forest edge, planted with edible plants. Picture all of the vertical layers of a forest growing together: Tall trees, small trees, shrubs, herbs, and ground covers. Tall, canopy trees grow inward from the edge, with smaller trees peeking out from underneath the tall trees to catch some of the sun’s rays. Stepping farther out into the sunshine are shrubs, with herbs, flowers, and ground covers blanketing the sunniest edge.
A typical forest edge can look a little busy, sometimes with vines growing up the trees and even mushrooms growing under the tallest trees in the shade. All of these layers of the forest are stacked together, each situated for sufficient sun exposure, and intertwined to produce a vibrant, productive, low-maintenance, and relatively self-maintaining ecosystem.
In a healthy forest setting, humans aren’t needed for weeding or fertilizing.
An example food forest might include chestnut trees as a tall canopy tree layer, with apple trees below them as an understory tree layer, followed by currant bushes, a host of edible herbs and mushrooms grown underneath, and perhaps even grapevines that use the apple trees as trellises.
Swap out my selections above for your favorite nut trees, fruit trees, berry bushes, and herbs to make your own system!

Photo Credit: ideath Flickr
History of the Food Forest
Managing forests for their edible benefits to humans is an ancient practice, with evidence and existing food forests having been found in Africa, Asia, and the Americas. As the New World was colonized, many of the first colonists and anthropologists didn’t know that they were looking at managed systems. To them, the forests in front of them looked like untouched forest.
What we realize now, of course, is that these early, native hunter-gatherer societies didn’t wander around aimlessly in search of food. They knew which areas produced which desirable foods (or medicines) and at which time of year, and it informed their movement. As they moved through forest and prairies areas, they would encourage edible plant species by cutting back the growth around them and giving them the space to grow abundantly and reproduce.
It was an early form of forest gardening.
They wouldn’t have spent a ton of time or effort, and it wouldn’t look pristinely weeded, but the desired plants would certainly be given an advantage over other plants.
Geoff Lawton found a 2,000 year old food forest in Morrocco. 800 people farm the desert oasis that includes, among other edible plants, date palms, bananas, olives, figs, pomegranate, guava, citrus, and mulberry. He also found a 300 year old food forest in Vietnam that has been cultivated by the same family for 28 generations.
With these ancient stories in mind, we can create vibrantly abundant and healthy edible perennial gardens that require a lot less maintenance and that can become a legacy into the future. This is the inspiration behind the modern food production strategy called a food forest.
Would you like to learn more about using permaculture techniques to improve the biodiversity of your garden, reduce maintenance, and increase yield?
You’ll find loads of information just like this in my book, The Suburban Micro-Farm.
The Benefits of an Edible Perennial Forest Garden
Perennial gardens don’t disturb the soil regularly like annual gardens do, but rather, they continually enrich soil with organic matter as leaves fall and plants die back for the winter. The food forest model can help to restore land, biodiversity, and habitat while creating an edible yield.
A forest is one of earth’s most stable ecosystems, and if we can mimic this ecosystem as a food production strategy, we get all of the ecological benefits of a forest PLUS food.

Food Forests vs. Orchards
Imagine planting a 0.10-acre site with about 30 apple trees to create a mini orchard. For the home gardener, this would obviously yield a lot of apples! But a single-species orchard can be a tough space to manage, as it is a monoculture of sorts and could attract pests and diseases that discover the smorgasbord of their favorite food. This would require you to spend time and money on pest/disease treatment.
The standard apple orchard arrangement also doesn’t take advantage of the vertical space above and below the trees. There is a single harvest opportunity of apples, and if it’s wiped out by disease or pest, there would be no reward for your efforts.
The single species—all needing the same nutrients in the soil—would, over time, deplete the soil and need imported fertilizer.
If we take the same site of the apple orchard and plant it with a food forest, we might be able to triple the yield in the same amount of space.
How would that work?
Imagine the northern edge (if you’re in the northern hemisphere) of the orchard being planted with a row of tall nut trees. Instead of rows of all apple trees, we could alternate apple trees with plum trees and cherry trees, for example, or whichever fruit trees would be appropriate to the climate. If it were a commercial area, we would also choose fruit crops that have high economic value. In the rows with the fruit trees, we could plant some nut- or berry-yielding bushes.
Underneath and between all the trees and shrubs we could seed a variety of herbs and flowers that help to add nutrients to the soil (fertilizer and soil building), attract beneficial insects (pest prevention), attract pollinators (for better fruit set), and add potential harvests in the form of cut flowers and culinary or medicinal herbs.
Some of my favorite understory herbs are yarrow, calendula, chives, comfrey, and daffodils. I like to seed the whole area with clovers.
I call this an orchard on steroids!
Because we’ve created a biodiverse ecosystem instead of a monoculture, we’ve lessened the threat of pests, reduced the need for fertilizer, lowered the amount of maintenance required, and hopefully, increased and diversified the yield. This diversity encourages more stability in the system.
In the backyard, this is great news, because few households will be able to use 30 bushels of apples! It would be nice to have a diversity of edible products.
If you’re growing apples or any other fruit for commercial purposes, you’ll find excellent examples of successful food forest commercial operations by Mark Shepard of the 106-acre New Forest Farm in his book Restoration Agriculture and by Stefan Sobkowiak, who shares his experience of transforming a conventional apple orchard in the feature-length educational film Permaculture Orchard.
https://www.tenthacrefarm.com/2017/07/create-a-food-forest-for-low-maintenance-edible-rewards/
On – 28 Jul, 2017 By Amy
-

We Need to Put More Biodiversity on the Sustainable Development Menu
In this guest blog post, Ann Tutwiler, Director General of Bioversity International kicks off our brand new series “SDG2 Countdown”. For five weeks, we will count down to the United Nations’ meeting that will track SDG progress, by exploring the five targets related to SDG2: ending hunger. This week, we explore SDG2.5: protecting genetic diversity. Visit www.farmingfirst.org/SDGs for more.
When the UN announced its Decade of Action on Nutrition in 2016, hot on the heels of the Sustainable Development Goals, many media outlets used a picture of a child eating a bowl of white rice, to illustrate the promise of better nutrition for all.
There’s just one problem. Rice alone is not enough. Yes, it will prevent the most basic form of hunger but rice lacks many of the vitamins and minerals essential for good health.

Photo credit: Wagner T. Cassimiro Without these vitamins and minerals, this child’s growth will be stunted, his immune system weakened, and his intelligence lower than it ought to be, costing him a lifetime of lost income and productivity. That is why the Sustainable Development Goal’s Target 2.1 of “access to safe, nutritious and sufficient food all year round” is so important, because it adds “nutritious” to “sufficient”.
I don’t want to downplay the importance of “sufficient”; we face a great challenge in ensuring enough food for everyone in the face of both climate change and population growth — a challenge that Bioversity International and agricultural biodiversity are helping to meet. For now, though, let’s concentrate on “nutritious” food.
The most important factor in a nutritious diet is diversity. That concept is enshrined in national dietary guidelines around the world, with their advice to eat fruits and vegetables, whole grains, pulses and so on. Research conducted by Bioversity International in collaboration with the Earth Institute shows that increasing food supply diversity is associated with lower levels of acute and chronic child malnutrition (stunting, wasting and underweight) at a national level. Agricultural policies and funding for research, however, generally focus on the four or five commodity staples that supply the bulk of calories. From the 5,538 known plant species, just three — rice, wheat and maize — provide more than 50% of the world’s plant-derived calories.

And although people may be aware that they should make healthier choices, the food system that surrounds them — which is the product of both food industry and government policy — often makes it difficult to choose a more diverse and more nutritious diet.
Nutritious staples
One successful approach is to diversify staples — mainstay foods — in the diet to include more nutritious alternatives.
For example, bananas are the fourth most important food crop in Africa, which is also home to high levels of vitamin A deficiency, a major public health problem in many developing countries. Every year, a half a million children go blind from the lack of vitamin A, and half of those die from infections.
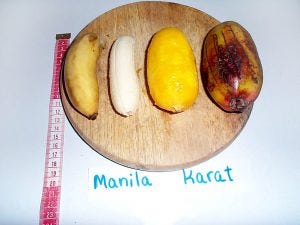
Orange-fleshed Fe’i bananas from the Pacific. Photo credit: Bioversity International ‘Mining’ banana diversity to find varieties with a higher content of vitamin A could be part of the solution. It is estimated that there are over 1,000 varieties of bananas in the world, which range from green to pale yellow to orange to dark red. The genetic diversity in these varieties determines not just these differences you can see and taste, they also determine micronutrient levels. For example, the orange-fleshed. Karat banana contains 1,000 times more of the pigment which the human body can convert into vitamin A (carotenoids) than the Cavendish banana, which is the variety of bananas most Western consumers see in their supermarkets.
Bioversity International is conducting research with partners in Burundi and the Democratic Republic of Congo (DRC) to see how using this banana diversity can help increase the levels of vitamin A in diets.
In India, we are also working to bring different kinds of nutritious and resilient millets, which were once part of traditional diets, back to plates and markets. While widespread famine in India is a thing of the past, malnutrition is not. India has high levels of stunting in young children and, by contrast, equally high levels of overweight, obesity and illnesses such as heart disease and diabetes.

Children in Kolli Hills enjoy eating millets. Photo credit: Bioversity International/ G. Meldrum Foxtail millet, for example, contains almost twice the protein of white rice, and little millet almost nine times the iron. In just three months of replacing white rice with millets in school meals, children gained weight and had improved haemoglobin levels.
Results such as these, and many more from Bioversity International’s work on neglected and underutilized species, helped prompt the national and state authorities in India to amend their food legislation. Millets are now included in some state school feeding programmes and have been incorporated in the national public distribution system. This is obviously a good thing for the poorer and nutritionally vulnerable people who receive subsidised food, and it also benefits the farmers who grow millet, which is much less ecologically demanding than other staples. Nutrition, local economies, the environment and food security: all thus gain from expanding the diversity of diet.
We can do it
There is no single solution to combat malnutrition, but using more diverse crops and varieties in our fields and on our plates must be part of the solution.
To make this a reality, we need to take action at multiple levels. Consumers can influence production by choosing nutritious, fresh, local and diverse foods. Agricultural research should increase knowledge on the use of agrobiodiversity to make farming systems more nutritious, resilient and sustainable. Governments can make the difference by creating food and agricultural policies that promote and integrate agrobiodiversity as an essential tool to achieve multiple Sustainable Development Goals.
Use #Ag4SDGs to search for more content and share your own biodiversity stories on Twitter!
-

Creating a Food Forest – Step by Step Guide – Permaculture Apprentice
One of my earliest memories of visiting my grandparents’ farm was playing on the dry stone wall, tossing stones around and just generally fooling around.
Then, looking down, I came across a small seedling sticking out the side of the wall, growing in nothing, with barely any soil between the stones.
Out of childish curiosity more than anything I decided to set it free from the heavy stones and leave it to grow on its own. That was 20 years ago…
 Today, that seedling is this strapping young fellow on the image left – European Ash tree.
He has survived the droughts, heavy snows, pouring rains and sub-zero temperatures all by himself, without anyone taking care of him.
As I sit under his shadow today and plan my food forest I’m curious to find out how trees flourish without human intervention.
How come wild apples, plums and cherries from the nearby forest do so well while the cherry tree I planted in my orchard five years ago has died miserably? To understand this I needed to return to the place where the seed of this Mountain Ash tree came from and revisit my teacher – the forest itself.
Forests are our teachers
Just by my house, some 50m away is an entrance to a forest. I visit there often, it makes me feel relaxed, I enjoy the serene sounds of nature, the falling leaves, birds and other critters. Most importantly, I go there to observe and learn.
You see, given enough time every ecosystem ends up like a forest. This is the end point of an ecological succession; a point where the ecosystem becomes stable or self-perpetuating as a climax community and, without any major disturbances, the forest will endure indefinitely.
This is exactly what you want your own food forest to be like. To achieve a low maintenance abundance of fruit, nuts, berries and herbs you’ll want to create a forest-like system where fertility comes from various sources, where you’re greatly aided by fungi, where wildlife is your primary pest control, where soil holds water like a sponge, and where you have a high diversity of plants.
You want a carefully designed and maintained ecosystem of useful plants and emulate conditions found in the forest.
However, the problem is often that you’ll find yourself starting out with a bare field, a blank canvas and the overall plan can feel a little overwhelming. Sometimes even reading books such as Edible Forest Gardens can make things harder rather than easier.
While creating my own food forest, I broke down the plan into smaller, manageable steps. I want to make as few mistakes as possible and to be honest, I don’t have time to make them.
Right, let’s dive in and see how this process can help you go from that bare field to a fully-functioning ecosystem inspired by forests.
1. What do you want from your food forest?
First you have to be clear about the ultimate goals of your project.
Why is this important?
You see, with a clear goal, everything becomes easier, you know where best to place your efforts and, most importantly, what are the priorities, what to focus on and what to postpone for the time being.
You have to think are you doing this because of: 1. being more self-reliant, 2. making an income, 3. producing healthy food 4. educating others 5. having a fun project for all the family
As you can see, each of these will require different considerations for your precious time and money. For example, if your goal is to create an income from your food forest, you’ll want to focus on researching which tree crops sell well locally and then think about how to grow them in the most efficient manner.
On the other hand, if you just want to be more self-reliant, you’ll want to think about how to create a diverse food forest with as many fruits, nuts and herbs as possible to fulfill your needs and stop being dependent on the grocery store.
Don’t overdo the thinking at the outset, but just be clear what you want from the beginning.
2. Explore, Sit Quietly and Observe, Analyse
- Explore your local forest so you’ll have an idea what will grow best in your area
Start with taking casual walks in your local forest. When designing a food forest you want to learn from the local ecosystem and try to emulate it. This is why such observations are important, this is how you discover what plants will grow best in our area.
You’ll want to look around and identify the plants that are thriving. As Mark Shepard would say: identify the perennial plants, observe how they grow in relation to one another, and take a note of the species. Later on, you can use that list to find commercial productive variants of the wild plants that you can grow in your food forest.
This step is crucial, because if you want to create an edible landscape that requires less work and maintenance, you need to grow species that are well adapted to your area, i.e. species that are volunteering to grow around your site.
If you have nature as your ally and use the natural tendencies of the native vegetation, then you’ll be doing considerably less hard work. This is one of the fundamental permaculture principles of working with nature rather than against it.
For example, when I walked in my forest I saw elderberries, hazels, hawthorns, lindens, cherries, apples, junipers, and the list goes on. So, guess what I’ll be growing in my food forest?
I’d also be taking seeds from those naturalized species and using them as rootstock for my plants. But that’s a lesson in itself, so be sure to read my post on growing trees from seeds.
- Sit quietly and observe your site
Next, sit at the future site of your food forest, no matter if it’s 5 or 50 min, just sit there quietly. Brew yourself some coffee or tea and just be mindful of what is happening around you. Immerse yourself and study the wildlife, feel the breeze, listen to the sounds of the natural world around you. You can learn a great deal simply by sitting quietly.
One of my best ideas, and one that saved me a lot of time, came when I just sat down and observed my site. For years, I tried to get a wild hedge under control and year after year I was cutting it, but it kept on re-sprouting. This mindless management involved a great deal of work, as I always found myself battling against the hedge’s natural inclinations.
It wasn’t until one day, when I was sitting quietly looking down at the hedge, that I came up with an easy solution to the problem. I asked myself a simple question: How can I let nature do the work for me? As I observed the hedge more thoughtfully, I realized that some of the species growing there were actually useful, while with others, I had even planned to grow them there anyway.
If I just gave a head start to species I want there, they would eventually overgrow the ‘non-useful’ ones, and I wouldn’t need to mindlessly cut down everything each year. Sometimes we are just too much in working mode to come up with solutions that are actually a whole lot easier. Having the time to observe, think and ask the right questions helps us save money, time and unnecessary labor.
These moments of mindfulness help put things into perspective and reveal a wealth of important information about the site itself.
- Do a site survey and make a basic map
It’s time to put on your permaculturist explorers’ hat and take notes about your site. You’ll want to ‘read the landscape’ and note down everything you can decipher about your water situation, climate, soil, slope, aspect, wildlife…
The landscape you see around you and its resulting ecosystems are formed from the interaction of climate, landform, soils and living things. Therefore, to better understand your site, you should analyze these elements, or parts of them, one by one…
At this point, you want to be actively involved and walk the site, conduct surveys and look at different natural processes. You can use modern technology (smartphones and desktop computers) to help you understand the weather patterns, terrain shape and water movement across the land.
You also want to get your hands dirty and investigate your soil’s texture, structure and biological activity. You can also perform some lab tests on your soil and experiment with some basic tests yourself. There are many things to explore. Help yourself and download my checklist below.
Download your free site survey checklist HERE!Based on the information you’ve collected, make a rudimentary hand-drawn map or use Google Earth as a base layer and annotate the printout with your notes. You can even make multiple thematic maps for each of the landscape components you’ve analyzed.
From the map, it should be visible where the site potentials lay, and what you’ll need to design for.
3. Design – Create a layout and choose the plants
- Choose a general layout – orchard, woodland, savannah
There are four basic layouts that determine the final look of the food forest: In their book, Edible Forest Gardens, Dave Jacke and Eric Toensmeier suggest more options but I’ll round it down to the basics:
- Savanna type systems – alley cropping and silvopastoral system – examples: Mark Shepard/Grant Schultz
- Orchards – woodlands with regularly spaced trees – examples: Permaculture Orchard, David Holmgren
- Mid – to late succession woodland – this is what we are trying to emulate – examples: Robert Hart, Martin Crawford
- Closed canopy forest – end point of a succession – these are mature forests – example: “Your local forest”
Which layout suits you best depends on your goals and your site’s characteristics (climate, terrain, biome, etc.). Different systems require a different design approach, management, and maintenance….
Savanna-type or agroforestry systems are based on a keyline design and are much better suited for commercial fruit, nut and herb production. Usually implemented on a broadacre scale, this is a layout with equidistant rows that enables efficient machine harvesting.
The woodlands we call orchards are more of a hybrid system that you can use for both commercial production and home use. The layout also has equidistant rows, but permaculture orchards are usually implemented on a relatively smaller scale.
Mid- to late succession woodlands offer the opportunity for the most varied, interesting, complex, and productive patterns of trees shrubs and herbs. Although primarily geared towards home food production, you can implement this layout on your suburban backyard but also scale up to a farm scale.
Wondering how to start planning the layout. Download this free step-by-step guide and find out how to design a permaculture orchard?- Start by outlaying your infrastructure first
Start your design with the scale of permanence in mind and plan your water, access and structures first. It’s best to begin with these essentials because they will be the most permanent elements of you food forest.
This includes thinking about the most suitable places for your water tanks, irrigation lines and other water elements, as well as planning for the locations of access points, different buildings and fences.
Water planning comes first, as water is the number one priority for any permaculture system. The water systems that you develop in this stage will become permanent land features that other infrastructure components will follow.
Immediately after designing the water systems, consider where to put your roads and paths. Their placement will define your movement around your food forest for many years to come, so think long and hard about their potential locations. Once they’re in, it’s hard to rearrange them.
The pattern of the fencing will generally follow that of access, and you’ll be able to subdivide your food forest into different growing zones. By doing so, you’ll be able to manage and protect them separately if necessary. Finally, consider where to put different buildings, if any…
Good infrastructure design is essential in order to minimise maintenance, maximize productivity, and provide a habitat for beneficial animals.
- Make a list master list of plants you wish to grow
Make a master list of plants – your desired species and others necessary to fulfil a certain purpose in your food forest. Think about ecological functions needed throughout the garden such as food production, the gathering and retention of specific nutrients, beneficial insect nectar plants, and ground cover for weed control.
Create a spreadsheet with each of these categories, do the research and list all the plants you want. Now, if there is a desired species that simply won’t work on your site, you can always find an ecological equivalent, i.e. an ecologically similar species that fills a similar community niche in comparable habitats.
For this you can use climate-analogous species. Based on the climate classification of your site, you can find almost identical climates across the globe, and then, by researching plants in those areas, find all kinds of interesting species you didn’t know you could grow.
However, growing plant species that aren’t native to your bioregion can be working against the natural tendencies of your site. You can make things easier on yourself and only focus your attention on what’s proven to work. Here’s what I mean…
Based on the inspection of your local forest in step 1, you’ll have an idea what species grow best in your area. These native and naturalized species are part of the already functioning and thriving ecosystem. All you need to do now is imitate that ecosystem on your site but use the more productive variants of these species.
Be sure to include these plants in your master list!
- Create guilds from your master list of plants
This is the very core of forest gardening. You want to create effective polycultures that share the resources and mutually support themselves. But how can you choose the right combination of plants? Here are just a few of the recommendations from Edible Forest Gardens.
You can do your guild build based on what you know or guess about plants, their species niche, and how they interact. In this way you can also create novel plant combinations through your experiments.
You can create a random mixture. A lot of people will just select a group of interesting plants and throw them together and see what happens. However, while it is sporadically ok to do so to spice things up, if the whole garden is like this, it will probably result in failure.
You can also try to emulate a habitat and use a model ecosystem as a template for design, incorporating species directly from the model habitat. This model habitat could be your local forest.
This is, of course, the easiest way to win. Here, you’re not inventing anything new, rather you’re copying what already works in nature. All you need to do is observe how the native plants grow in relation to one another and imitate that in your food forest.
If you’re not sure where to start, Download my free PDF with 5 Temperate Climate Guild examples you can recreate in your food forest.- Do a patch design – define your planting areas and plant spacing
Design your patches one by one, a patch could be a row, a contour or a grouping of plants in one area. However you decide to tackle the patch design, the most important aspect is deciding on the planting distance.
If you followed the design process and started your design by choosing the overall layout, you should already have an idea on the distances between the patches. Now let’s look at how to space the plants within the patch itself.
The easiest way to determine this spacing is by using the ‘crown touching rule’ and placing the individual trees a crown’s diameter apart. For this, you’ll have to find the information on the size of the individual mature trees’ crowns and use that as your guide.
Usually, the biggest mistake people make is overly-dense spacing where tree crowns are interlocking. This is OK when you’re planting a screen or hedge, but otherwise this will put stress on the plants and limit their growth.
In his book, Creating Forest Gardens, Martin Crawford recommends adding 30-50% more distance around each woody plant if you want more sunlight for understory plants. Also, you want to plant wider than ‘crown touching’ distance when soil conditions are limiting, in order to reduce competition between plants for limited resources.
4. Prepare the site
- Adapt your site if necessary
If you’re not starting from scratch with a bare field, the chances are there is something already growing there and you’ll need to adapt your site accordingly. This means clearing unwanted vegetation and leaving whatever you find useful. You can use any available biomass for mulch, compost, wood chips, firewood, mushroom inoculation….
For example, I will be leaving some naturalised plums and using a wood chipper to create some mulch from the trees and branches I don’t need, plus I’ll be using the wood for my hugel beds.
- Shape the earth to your advantage and optimize water retention
After you cleared the vegetation, you can start the earthworks for optimizing water retention on your site. This involves shaping the earth in a way that promotes water infiltration, distribution and storage.
Effectively, what you want is to do first is to slow, spread, and sink the water as it falls from the sky into the soil. The soil is the cheapest place to store water, and it’s the largest storage resource available on most sites. To do this, you can use two very famous techniques: keyline plowing/subsoiling and swales on the contour.
Following this, you want to have a way to capture as much water as reasonably possible and store it for dry periods. You can do this by digging ponds that will store the water and diversion drains that will collect and distribute that water when necessary across the site.
Whether you’re going to use one or both of these strategies depends on your site conditions: climate, terrain, soil, your context…I think one question on everybody’s mind is whether or not to swale it. For assistance, I would encourage you to look at this cheat sheet by Ben Falk if you’re in two minds about doing swales on your site.
- Set up infrastructure and put down irrigation, pathways and fencing
Following the earthworks, begin with the most difficult, important or permanent elements of the food forest.
Start by putting down pathways throughout your site, they are important as they define your different growing zones and protect them from the compaction. You want to minimize compaction in the areas you’ll be planting soon after and having clearly defined pathways keeps you on track (pun intended).
A well built pathway can also act as a hard surface runoff and collect the water that you can then connect with your other water elements you built in the previous step. Integrate rather than segregate!
Fencing the site is the next important thing. I can’t recommend building a main perimeter fence and enclosing your whole site strongly enough. Importantly, there are security issues and protecting from theft or trespassing and, moreover, I hear a lot of people regretting not doing this type of a fence first in order to ensure that their trees get protection from wildlife.
You don’t want those deer, coyotes, kangaroos, sheep or rabbits nibbling on your seedlings.
Finally, if necessary, put down irrigation and install water tanks – you simply can’t overdo it when it comes to making sure there is enough water during the months of drought.
- Build up your soil and improve the soil structure
It will come as a surprise to many, but improving the soil first rather that planting straight away saves time. This is because waiting for a year and simply conditioning the soil during that time and then planting in year two yields better results than planting immediately.
For improving the soil in this transitional period prior to planting, you can add soil amendments such as compost, compost tea, fertilizers or use cover crops, all with the goal of improving the fertility of the soil so that your plants get a decent head start. However, there is a caveat to this soil building…
Ideally, food forest soils contain a fungal presence ten times higher than that of bacteria. So you should aim to recreate those conditions.
In the beginning, you’ll be probably starting out from a bare field and you want to continually nudge your soil towards fungi domination. You can do this by inoculating the soil with fungi or cover cropping with green manure crops – Michael from the Holistic Orchard recommends red or crimson clover in preference as these two nitrogen-fixing legumes have a stronger affinity for mycorrhizal fungi. Finally, you want to spread woody mulch everywhere to feed the fungi in the soil.
For more info about improving the soil in your food forest read my Definitive Guide to Building Deep Rich Soils by Imitating Nature.
5. Source the plants and start planting
- Start a nursery or buy plants – your choice
Now that all the preparation work is complete, you can start planting. You basically have two options depending on the budget: grow your own trees (and shrubs of course) or acquire young ones.
If you’re on a tight budget, I would suggest growing most of your trees yourself. Actually, regardless of your budget, you shouldn’t stray from learning how to grow your own trees. This is one of the most important skills you can have as a permaculturist, and the chances are that sometimes the type of the trees you’ll need won’t be even available to buy.
Growing your own trees is like printing your own money. It’s actually quite simple and you don’t even need that much space. You can read all about it in my post on ‘How to set up a Small Permaculture Nursery and Grow 1000s of Trees by yourself’ and start your nursery today.
Another option is to buy young trees from nurseries. However, the trees will be more expensive, already grafted and probably already one or two years old. If you have the budget and don’t have time to grow your own trees or to wait, this is the way to get an instant orchard without the hassle of setting up a nursery.
- Phase your project and plant in stages
Planting a food forest can take place in stages or all at once. However, being honest, you’re unlikely to do it all in one go. More realistically, you’ll be planting your food forest in stages and over the course of several years. As long as you already know the outline of your rows or patches, you’ll know where to plant. After this, it’s only a matter of slowly filling the space with plants.
The establishment in stages normally involves planting hedges and/or canopy trees in the first year or two, then later shrubs and a ground cover layer. Here is a recommendation from Martin Crawford’s Creating a forest Garden book:
Windbreak/hedges and edges>>Canopy layer including N fixers>>Shrub layer including N fixers>>Perennial/ground cover layer>>annuals, biennial and climbers.
Depending on your layout, you can also add annual veggie production to this. At least in the beginning, there will be a lot of light and space available for you to use to grow your beyond organic vegetables.
- Finally, put your plants in the ground
I won’t go into detail on how you should be planting, for step-by-step details watch the Permaculture Orchard documentary where Stephan explains how to plant a tree in great details.
In short, just make sure you dig a large enough planting hole, spread the roots and sprinkle in mycorrhizal inoculant or dip the roots in a mycorrhizal root dip if required, then refill the hole with the soil you took out.
In almost every instance, you should use sheet mulch after planting to control the weeds. Unless the soil is very poor, do not add extra materials to it. Most importantly, don’t forget to mulch with the right type of material, since you’ll be growing woody perennials you’ll have to feed the soil biology (fungi) with woody mulch.
Conclusion
Creating a food forest is a multi-stage process and you don’t have to go through all the steps outlined above in the exact order. The idea behind this post is to give you a framework for planning and planting your first trees. Aftercare and maintenance will be a subject for another post.
There are four main books I would recommend if you’re serious about starting a food forest: Edible Forest Gardens, Creating a Forest Garden, Holistic Orchard and Teaming with Microbes – there is plenty of invaluable advice to be found in each.
So, where are you in the whole process of creating a food forest?
Let me know in the comments section below!
https://permacultureapprentice.com/creating-a-food-forest-step-by-step-guide/
On – 05 May, 2017 By papprentice
-

How To Create A Permaculture Garden That Supports Your Local Ecosystem
There is no set formula for developing this type of permaculture garden design, but there are some permaculture best practices:
1. Copy nature’s blueprint and enhance it with useful plants and animals. Think of the structure of a forest and try to mimic it with your plantings. A canopy of tall trees will give way to smaller ones, flanked by large and small shrubs and, finally, by the smallest plants. Edge habitats, where trees border open areas, are perfect for fruiting shrubs, such as currants, and for a variety of useful native plants, such as beargrass (xerophyllum tenax), which is used for weaving baskets. Mimicking these natural patterns with permaculture provides for the greatest diversity of plants.
2. Stack plants into guilds. A guild includes plants with compatible roots and canopies that might be layered to form an edge. As you learn more about your site, you’ll discover groups of plants that work well together. For example, pines, dogwoods, and wild blueberries form a guild for acid soil.
3. Make use of native plants and others adapted to the site (but defintely not these plants).
4. Divide your yard into zones based on use. Place heavily used features, such as an herb garden, in the most accessible zones. (Here are 7 backyard weeds that are actually medicinal herbs in disguise.)
5. Identify microclimates in your yard and use them appropriately. Cold, shady corners; windswept spots in full sun; and other microclimates present unique opportunities. For instance, try sun-loving herbs like creeping thyme on rocky outcroppings; plant elderberries in poorly drained areas.
On – 01 Mar, 2017 By
-

No dig, ditch back-breaking cultivation and grow great vegetables
Origins of no dig cultivation methods are not completely clear, but the benefits of having healthy soil, bountiful crops with minimal work is clear! Managing your allotment/home vegetable garden using techniques such as double digging are time consuming, labour intensive and damage the delicate balance which exists in soil between beneficial bacteria, insects and microbial content. All of which are vital to the health of your soil and by extension the health of your delicious crops.
Incorporating organic material into soil is not a new concept, worms, insects, fungi and microbes have been enhancing soils organic content whilst aerating and binding soil together without having to dig in composted green waste or similar materials by hand for millions of years. By studying nature we can find ways to create efficient systems which work and enhance the natural world.
Pioneers in the UK like Charles Dowding, have been growing crops such as salad leaves for years with the no dig method, ranging from small back garden operations to acres of crops, even mainstream shows such as Gardener’s World have started to see the benefits of permaculture and no dig, as shown by Monty Don. The main concept of the no dig garden incorporates the ideals and principles of permaculture by mulching your growing area with composted green waste, straw, leaf mould, composed bark chippings and similar material. These mulches help to suppress weeds whilst the worms, insects and microbes continue to break down all this lovely organic material, incorporating it into your soil.
For best results you can add other design elements alongside your no dig site to enhance biodiversity, attract beneficial insects such as predator beetles and pollinators and make the most of the water fall your site receives.
Some of the methods which you could use alongside your no dig patch are …
- Adding beetle banks
- Create insect hotels
- Companion planting
- Attract pollinators
- Create a mini wildlife pond
- Design for your lands water flow
Why not give the no dig style of cultivation a go and see what this wonderfully simple method can do for your garden/allotment this year. Wildlife & Eco Gardens can help you get started with your new gardening system or help with composting advice to get the best quality compost for your no dig beds.
On – 25 Apr, 2017 By
-

6 Ways to Increase Food Production in Your Organic Vegetable Garden
Please note that affiliate links are present in this post, which means if you click on a link a buy something, I’ll get like 4 cents for it at no extra cost to you. All recommendations are humbly my own.
-
1. Prepare Your Soil Using a No-Till Method
-

No-Till gardening requires nothing more than reliable tools and good old-fashioned hard labor. Good for you and your garden. - It’s a harsh fact that machines are destroying our soil! When we mechanically till our gardens, our soil’s complex structure gets broken up into tiny particles. Air pockets created by earthworms and arthropods diminish. Colonies of beneficial bacteria and strands of fungal hyphae break apart. When these tiny pieces all settle, they become extremely compacted, leading to poor drainage – the totally opposite effect we hoped tilling would have!
- There’s a common misconception that we must till our soil every spring to aerate, so “roots can breathe” and “water can drain more efficiently,” but the fact is: Tilling does NOT accomplish this. There many other ways we can prepare our gardens that are not only healthier for our soil, but also require much less money and equipment – my preferred method is Double Digging.
Related Enough: Epic Spring Planting Series: My Best Tips for Planting with Seeds
I first learned about double digging from John Jeavons, founder of Ecology Action and the Grow Biointensive farming method, and author of How to Grow More Vegetables, when he presented at the MOSES Organic Farming Conference in 2015. The Double Dig Method entails digging two layers of soil with a shovel using nothing but old-fashioned manual labor. Using the least amount of effort possible, the digger is to “twist” the soil in patches while amending it using organic fertilizers and compost. Watch this instructional YouTube video on double digging (note that there is a second part you’ll need to watch).
Side note, I have a 2-part Soil Building Series: Increasing the Biodiversity of Your Soil Food Web, Part 1 and Part 2. To really get to know your soils on a deeper level, and to learn how to care for them compassionately, I invite you to read those posts!
The benefits of double digging are endless. There’s no intense breaking up of the soil structure. There’s no mass killing of valuable microorganisms, so plants are naturally healthier. All of your earthworms, spiders, centipedes and other beneficial bugs will be left in tact. Your plants’ root systems will grow deeper and stronger. And what’s fascinating is, once you build your soil fertility with organic matter your soil will hold more water, reducing the need to water as often. All of this means MORE FOOD!

Worms are so incredibly important for our gardens and when we are gentle with our soils, we preserve them and their delicate work. Totally Related: 7 Best Organic Soil Amendments for Your Garden
amzn_assoc_placement = “adunit0”; amzn_assoc_search_bar = “true”; amzn_assoc_tracking_id = “heirloomsoul-20”; amzn_assoc_ad_mode = “manual”; amzn_assoc_ad_type = “smart”; amzn_assoc_marketplace = “amazon”; amzn_assoc_region = “US”; amzn_assoc_title = “Stuff We Love for Soil Prep”; amzn_assoc_linkid = “5784ba14ef33b867e91e1877f5f21b5c”; amzn_assoc_asins = “B010CXJ0L4,B00AE12V5M,B00OHSFEG6,B010CRGKAE”;
-
2. Improve Your Soil Biodiversity with Homemade Compost
- If you know anything about compost, let it be this: Not all compost is created equal! The nutrient content of the compost you are using depends on what it is made out of. Did you acquire it from your municipality, in which case it could be mostly decomposed grass and tree trimmings, potentially laden with herbicides? Or did you make it yourself, in which case it is probably a richer concoction of grass and leaves from your yard, kitchen scraps of fruits, herbs, veggies and egg shells, and all kinds of organic matter from your own garden?
You see where I’m going with this. Compost is a great way to feed your garden and introduce more biodiversity into the soil, ideally at the end of the season or during soil preparation.

Homemade compost is the BEST compost – and it doesn’t have to be hard! The best compost to use is your own because you control what goes in it. All of the different types of organic matter we throw into our compost support different types of microbes, and this vastly increases the biodiversity and the nutrient content of our end product. A more biodiverse compost pile means a more biodiverse garden.
Some of us don’t have room to make compost. If you’re one of these people, getting compost from your municipality is fine – usually it’s free, and everyone loves free!
-
3. Stop Stepping on Your Soil
- This might sound obvious, but I’m adding it in here and for good reason: I’ve worked with a ton of people who stepped all over their garden beds until they worked with me. Soil compaction is one reason, while the breakage of tender plant roots is another, but the main reason why you should never, ever step on your soil is because your weight crushes and suffocates your microbes. Healthy soil food web = More nutrients in your veggies!
By now you’re going, Really? For the third time? Microorganisms, microbes or whatever the heck those things are she’s talking about?
The books below changed my life as a gardener and will also help you understand microbes, and your garden, like you never have before:
amzn_assoc_placement = “adunit0”; amzn_assoc_search_bar = “true”; amzn_assoc_tracking_id = “heirloomsoul-20”; amzn_assoc_ad_mode = “manual”; amzn_assoc_ad_type = “smart”; amzn_assoc_marketplace = “amazon”; amzn_assoc_region = “US”; amzn_assoc_title = “”; amzn_assoc_linkid = “be1d2f3f6543bfbef748e4958a695d08”; amzn_assoc_asins = “1604697296,1604691131,1580085792,1603580298”;
I use “microorganisms,” “microbes,” “soil biodiversity,” “microbial life,” and “Soil Food Web” interchangeably throughout my posts, but I mean generally the same thing when I talk about how important they are – “they” being a collection of bacteria, protozoa, nematodes, algae and fungi, billions of which can be found in one tablespoon of your soil. Caring for these living creatures is the most important aspect of growing food.
So, a solution to stop stepping on your soil. You need clearly marked, delineated pathways throughout your garden. And once you’ve developed this pathway system, it needs to always stay that way. My favorite and easiest to use path materials are straw, wood chips and stepping stones.

Pathways are the best way to keep yourself, and everyone else, from stepping on your soil. 4. Mulch, Mulch, Mulch
It is so, absolutely important for you to mulch your vegetable garden. Not only does mulch keep weeds down and prevent moisture from evaporating quicker, mulch materials also break down over time and add valuable organic matter to your soil, and provide food sources for your soil food web. Most importantly though, mulch provides a thick, protective layer for your microbes against the harsh outdoor elements.

Spring bulbs loving life in a bed of nitrogen-rich leaf mulch. Though a full-sun space is a blessing and ever-desirable in organic gardening, it can have a detrimental effect on the top few inches of soil by completely drying it out. The top four inches of soil is where most of our microbial life is contained, and the hot sun will crisp and evaporate the little guys right up without a protective layer! Rain can also have undesirable effects – microbes are so tiny that raindrops falling on them has a similar effect not unlike our stepping all over them. The way we can protect our microbes from the natural elements is by using mulch.
Related Enough: Gardening Myths We’re Officially Breaking, or Why You DON’T Need Raised Beds and Fertilizers

The sun is incredibly powerful and will dry your garden right up if you don’t cover it with mulch. There are lots of different options for mulch, but here, I will highlight the simplest mulching solutions…
- – Straw is an economical option because not only is it initially cheap to buy, but you can also use it for your pathways. It is good to use around baby seedlings because it will help prevent birds from nibbling at them, and it will partially break down over winter so it may be incorporated into your soil during preparation in spring. Be sure to get “straw” and not “hay,” where seed heads are present.
- – Decomposed leaves, or leaf mulch, is an attractive mulching option and adds a good amount of nitrogen to the soil as it breaks down and becomes incorporated into the garden bed. Earthworms love it. If you have a lot of trees on your property, you could create a compost pile of leaves and make your own leaf mulch, otherwise it comes bagged at most landscape suppliers. Be aware that if you do not buy certified organic leaf mulch, the mulch you do buy could have residual pesticides – not great for us or our microbial friends.
- – Living mulch is a way of mulching by growing groundcover plants with shallow root systems in between vegetable plants, not unlike cover cropping. Growing living mulches takes a little more maintenance and technique (you must know what plants are acceptable to grow for living mulch and when to plant them), but anyone can do it! Living mulch is so great because it’s very cheap and easy to do (all you need are seeds), it adds lots of color and texture to your garden, and the added root system provides tons of extra food for microbes. Great options for living mulch are sweet alyssum, creeping thyme, creeping jenny, and arugula.
Totally Related: How to Cover Crop Your Vegetable Garden in 4 Steps
5. Get Your Fencing Right

Ok so this is kind of a joke… but not really. I’ve worked with people who put so much time and money into their fence but it wasn’t done properly so they might as well just had an adorable blue gate instead! My adoration for bunnies, squirrels, deer, and especially groundhogs, has waned since I became a vegetable gardener. When you grow food, animal families seem to multiply out of nowhere, and they all have this perfectly-timed instinct that tells them exactly when to nosh your harvest just hours before you can get to it. PESTS!
Totally Related: Battling Garden Pests: The Organic Pest Control of Mindfulness and Compassion
The only way for us to keep pests out of our garden is by building a strong fencing system. I will always say that with fencing materials and construction techniques, the higher quality your materials are, the better results you will have in creating an animal barrier. There will also be less upkeep with damage from storms and weight on it from heavy snow and ice.
There are some basic dimensional fencing details to know, based on what type of animal you need to keep out…
- – Bunnies – The openings in your fencing material should be no larger than 1”x2”, and I think this is a good rule for all garden fencing no matter the pest. Baby bunnies have the ability to get through 2”x2”, and they are everywhere. If you have a gate within your garden fence, be aware of the threshold gap at the bottom of it – the gap should be no more than ½” – a commonly overlooked detail! If you don’t have deer, a 3-foot tall fence is good enough to keep bunnies out. Keep in mind though that you can’t grow tall crops on such a short fence, so sometimes its nice to go vertical anyway.
- – Deer – Your deer fencing should be at least 6 feet tall, preferably 8 feet. It sounds hulking and fortress-like, but it’s actually nice to have fencing this tall because then you can grow pole beans, peas, cucumbers, squash and vining flowers on it. Deer have a tendency to eat plants through the mesh fencing, so you may need to attach a screen or a similar very fine mesh to keep their snouts out. Trick is to avoid attaching this screen too high, otherwise it will block sunlight.
- – Groundhogs/Gophers – These are burrowing animals, living up to 18” underground in large nests connected by a network of underground pathways. They’re incredibly smart. You’ll need to dig a deep trench (ideally 18”) and extend your METAL mesh fencing down that far to keep them out. Groundhogs are not typical in suburban backyards or city yards, but if you’re out in the country, or live near open fields of any kind, you absolutely need to protect your garden from groundhogs or all will be lost. I’ve learned this the hard way.
- – Chipmunks & Squirrels – Just forget it! No matter of fencing, unless you completely cover the top of your garden, will keep them out. If squirrels are taking bites out of your tomatoes, chances are they are sucking the juice out because they’re thirsty. Try leaving shallow dishes of water out for them to drink. I swear it works!

Ever see a squirrel drink? Now you have. They get thirsty, too! 6. Assess Your Tree Canopy
Trees grow fast. Sometimes just a few years after setting up your garden your trees can grow so much that new branches block primetime sunlight.

Trees cast much more shade than you would think, causing leggy, unproductive growth in your garden. If you notice your plants are stunted but you think you’re doing everything else right, I encourage you to spend some time in your yard one day and assess the sunlight in your garden. The Solar Pathfinder is an amazing tool I’ve used in countless gardens to determine sun exposure – it might be worth the price if your garden is large enough, creates revenue, or if you could split the cost of it with other gardeners.
Look up and see if any trees might be blocking the sun pattern. If they are your own trees, and are small enough, go ahead and trim them back with tall tree loppers. If the branches are larger and too high, consider calling a local landscaper or arborist for their tree trimming rates – it is probably worth the cost. You’d be surprised at just how one really tall branch can make hours of a difference in your garden! Visit this post for a blurb on how to determine the hours of sun exposure in your garden.
amzn_assoc_placement = “adunit0”; amzn_assoc_search_bar = “true”; amzn_assoc_tracking_id = “heirloomsoul-20”; amzn_assoc_ad_mode = “manual”; amzn_assoc_ad_type = “smart”; amzn_assoc_marketplace = “amazon”; amzn_assoc_region = “US”; amzn_assoc_title = “Products Mentioned in This Post”; amzn_assoc_linkid = “be1d2f3f6543bfbef748e4958a695d08”; amzn_assoc_asins = “B00AR0RMBI,B009378AG2,B00F0MB40S,B00NGYMVYK”;


http://heirloomsoul.com/6-ways-to-improve-your-existing-garden-tips-from-an-edibles-expert/
On – 09 Apr, 2017 By Fran
-

